

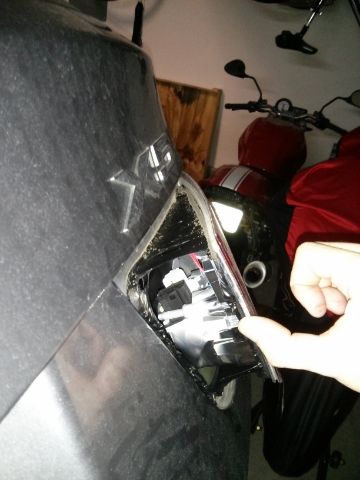
After reading yet again of someone having issues with the rear lights mounted on the tailgate I figured it was time for some preventive care. In the process I also addressed the source of an annoying rattle coming from the cargo area.
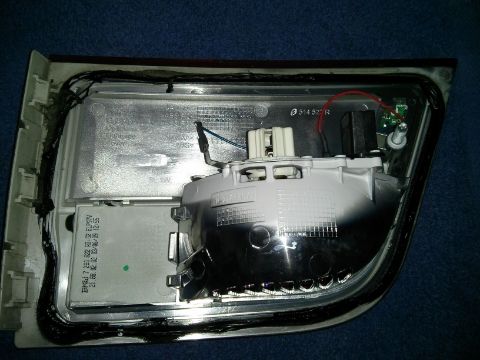
The lights mounted on the tailgate have a notorious water leak problem: there's a butyl tape gasket between the lights and the trunk lid that either doesn't adhere or just doesn't seal properly (if you have ever had water leaking into the car through the door vapor barriers you won't be surprised). As a result water finds its way through and drops either on the electric connector or ends up corroding the the little circuit board that controls the LEDs. To add insult to injury, the LEDs can only be replaced along with the whole light cluster.
![Image]()
![Image]()
![Image]()
BMW is well aware of this, issued a technical update and replaced the butyl tape with a soft rubber seal (this is not a service bulletin or a recall so don't expect your dealer to replace it). Here's that technical update: SIB 63 11 10 - Tailgate Lamp Leaking
As described therein, the soft rubber gaskets are available for retrofit. They are p/n 63 21 7 288 973 for the left and p/n 63 21 7 288 974 for the right.
The replacement is straight forward and it's well narrated in this video:
http://youtu.be/KGZ3GxH0Fs0
In addition, here's the printout of the official instructions on how to remove the various components:
- 51 49 000 - Removing and installing/replacing panel for rear lid
- 51 49 017 - Removing and installing/replacing trim panel for rear window frame on inside left or right
- 63 21 104 - Replacing sealing frame for left or right light (on rear lid)
- 63 21 183 - Removing and installing/replacing left or right rear light (on tailgate)
- 63 31 080 - Removing and installing/replacing luggage compartment light
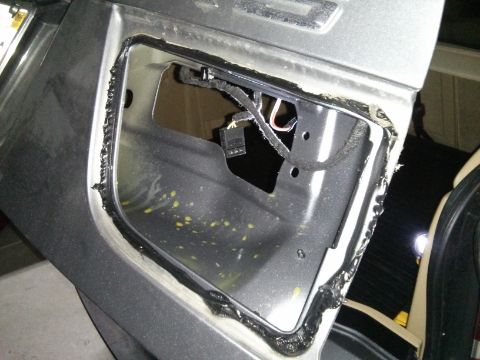
NOTE: the 10mm nut holding the light assembly can be accessed by simply removing the two rear lights, without the need of removing the whole rear panel. It is tight, but can probably be done. In my case, however, I used this occasion as a way to fix a rattle in the cargo area (more to come) so I removed the whole panel just as shown in the video.
Here's some tips:
- To remove the panel for the rear lid, look at the BMW instructions and visualize where the anchor clips are. Wedge the trim removal tool (or if you don't have it use a plastic spatula or a credit card; if neither works, use a wide chisel covered with duct tape or electric tape; if you'd like to do things by the book, HFT has an inexpensive set of trim removal tools Trim And Molding Tool Set) between the panel and the tailgate close to where the clips are. DO NOT use a screwdriver: it will dent the plastic and scratch the paint. DO NOT leverage against the glass as you'll run the risk of cracking it.
- Although the video doesn't, I suggest removing the trim panel on the left and right of the rear window. This will make it simpler to remove the panel for the rear lid, but, more importantly, will be much easier to ensure that the panel and the anchor clips are properly lined up when reassembling it: this is very important to avoid breaking the anchor clips (will come back to this). The official instructions above show you where the anchors are
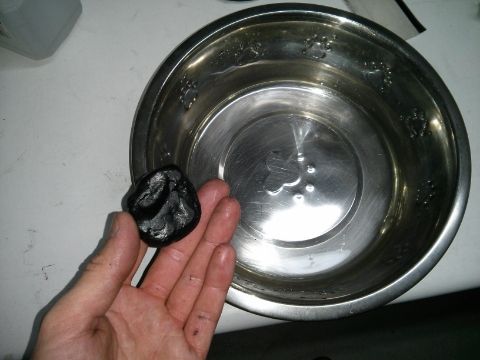
- The video shows how to remove the butyl tape: that's the trick I've been using it. However, because of hysteresis the butyl tape tends to heat up and becomes very gummy and messy. To avid this, occasionally dip the ball of butyl in some water.
![Image]()
- Once you're done removing the butyl tape, use some isopropyl alcohol to clean the surface on both the tailgate and the light assembly.
REINSTALLING THE PANEL FOR THE REAR LID
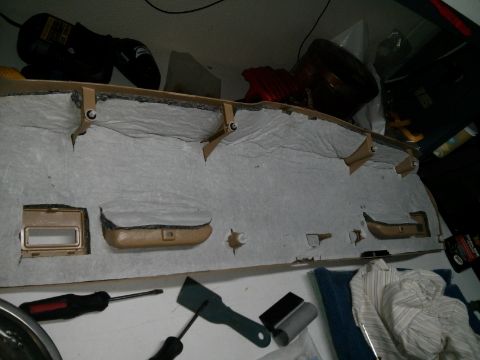
It is important that the panel is lined up properly or the anchor clips will break when you apply pressure to reengage them. Obviously at some point some monkey removed such panel from my car and broke 4 of the 8 anchor clips: that was making the panel creek over bumps or rattle in general.
![Image]()
![Image]()
My suggestion is to ensure you have a few of these clips handy in case they break in the process or you find them broken.
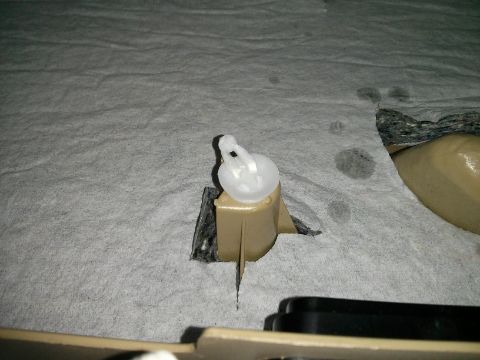
As you can see in the picture and described in the BMW instructions there's a total of 8 clips. The upper row (closer to glass) is a slightly different design than the lower row (close to the latch). The upper has a soft rubber gasket and they are ever so slightly shorter; other than that they are perfectly interchangeable. I ended up replacing all my clips with the kind with the rubber gasket as a further attempt to reduce vibrations and rattles.
The version with the rubber washer (upper row) is p/n 07 14 7 145 753 while the version without the rubber washer (lower row) is p/n 51 43 7 001 491. They cost less than a dollar so have some handy (I bought 4 and ended up using 1 extra I already had).
Again, visualize where the anchor clips are and if it helps put a tad of masking tape on the outside of the panel corresponding to the anchor clip. Make sure the wires for the lights, gate switch, and the emergency trunk release are thorough the holes in the panel. Once you have the panel lined up tap it with your fist where the clip is. If the clip doesn't engage, ensure it is lined up with the hole and try again.
The lights mounted on the tailgate have a notorious water leak problem: there's a butyl tape gasket between the lights and the trunk lid that either doesn't adhere or just doesn't seal properly (if you have ever had water leaking into the car through the door vapor barriers you won't be surprised). As a result water finds its way through and drops either on the electric connector or ends up corroding the the little circuit board that controls the LEDs. To add insult to injury, the LEDs can only be replaced along with the whole light cluster.
BMW is well aware of this, issued a technical update and replaced the butyl tape with a soft rubber seal (this is not a service bulletin or a recall so don't expect your dealer to replace it). Here's that technical update: SIB 63 11 10 - Tailgate Lamp Leaking
As described therein, the soft rubber gaskets are available for retrofit. They are p/n 63 21 7 288 973 for the left and p/n 63 21 7 288 974 for the right.
The replacement is straight forward and it's well narrated in this video:
http://youtu.be/KGZ3GxH0Fs0
In addition, here's the printout of the official instructions on how to remove the various components:
- 51 49 000 - Removing and installing/replacing panel for rear lid
- 51 49 017 - Removing and installing/replacing trim panel for rear window frame on inside left or right
- 63 21 104 - Replacing sealing frame for left or right light (on rear lid)
- 63 21 183 - Removing and installing/replacing left or right rear light (on tailgate)
- 63 31 080 - Removing and installing/replacing luggage compartment light
NOTE: the 10mm nut holding the light assembly can be accessed by simply removing the two rear lights, without the need of removing the whole rear panel. It is tight, but can probably be done. In my case, however, I used this occasion as a way to fix a rattle in the cargo area (more to come) so I removed the whole panel just as shown in the video.
Here's some tips:
- To remove the panel for the rear lid, look at the BMW instructions and visualize where the anchor clips are. Wedge the trim removal tool (or if you don't have it use a plastic spatula or a credit card; if neither works, use a wide chisel covered with duct tape or electric tape; if you'd like to do things by the book, HFT has an inexpensive set of trim removal tools Trim And Molding Tool Set) between the panel and the tailgate close to where the clips are. DO NOT use a screwdriver: it will dent the plastic and scratch the paint. DO NOT leverage against the glass as you'll run the risk of cracking it.
- Although the video doesn't, I suggest removing the trim panel on the left and right of the rear window. This will make it simpler to remove the panel for the rear lid, but, more importantly, will be much easier to ensure that the panel and the anchor clips are properly lined up when reassembling it: this is very important to avoid breaking the anchor clips (will come back to this). The official instructions above show you where the anchors are
- The video shows how to remove the butyl tape: that's the trick I've been using it. However, because of hysteresis the butyl tape tends to heat up and becomes very gummy and messy. To avid this, occasionally dip the ball of butyl in some water.
- Once you're done removing the butyl tape, use some isopropyl alcohol to clean the surface on both the tailgate and the light assembly.
REINSTALLING THE PANEL FOR THE REAR LID
It is important that the panel is lined up properly or the anchor clips will break when you apply pressure to reengage them. Obviously at some point some monkey removed such panel from my car and broke 4 of the 8 anchor clips: that was making the panel creek over bumps or rattle in general.
My suggestion is to ensure you have a few of these clips handy in case they break in the process or you find them broken.
As you can see in the picture and described in the BMW instructions there's a total of 8 clips. The upper row (closer to glass) is a slightly different design than the lower row (close to the latch). The upper has a soft rubber gasket and they are ever so slightly shorter; other than that they are perfectly interchangeable. I ended up replacing all my clips with the kind with the rubber gasket as a further attempt to reduce vibrations and rattles.
The version with the rubber washer (upper row) is p/n 07 14 7 145 753 while the version without the rubber washer (lower row) is p/n 51 43 7 001 491. They cost less than a dollar so have some handy (I bought 4 and ended up using 1 extra I already had).
Again, visualize where the anchor clips are and if it helps put a tad of masking tape on the outside of the panel corresponding to the anchor clip. Make sure the wires for the lights, gate switch, and the emergency trunk release are thorough the holes in the panel. Once you have the panel lined up tap it with your fist where the clip is. If the clip doesn't engage, ensure it is lined up with the hole and try again.


