BMW Forum - BimmerFest BMW Forums banner
Status
Not open for further replies.

Improving on a "Rather simple idea" (aka Version 2.0)

25K views 62 replies 11 participants last post by  lpcapital  
#1 · (Edited)
Like our best friend in the whole world says "Keep it as simple as possible...but no simpler."

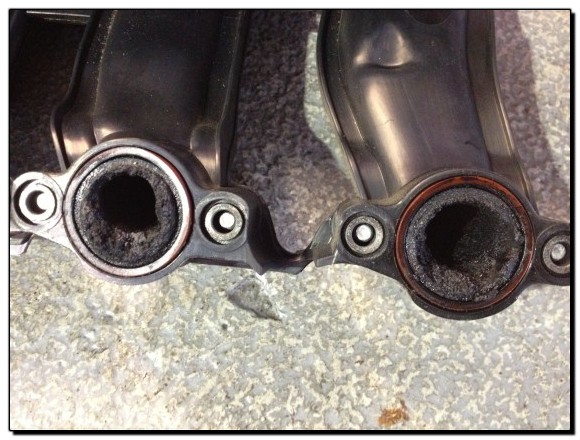
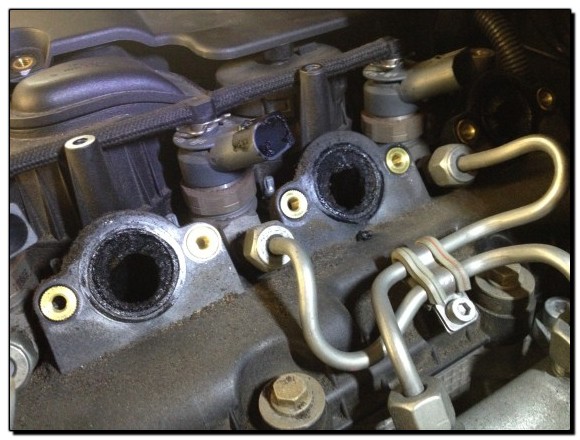
I think version 1.0 (http://www.bimmerfest.com/forums/showthread.php?t=774371) does an ok job: after disassembling it I noticed there was still a certain amount of oil passing through.

I did some more researching and found that coalscer filter works in 2 steps: step 1 they saturate by coalescing (http://www.merriam-webster.com/dictionary/coalesce) droplets of oil in the blow-by; once they get to a certain saturation they start with step 2 which is basically shedding the oil (you can read some more here: http://www.parker.com/literature/Racor/7678 (CCV Technical Brochure).pdf). If oil is not shed then is picked back up by the gasses... Well, I suspect my trick is not doing a good job at shedding the oil: it's basically too simple.

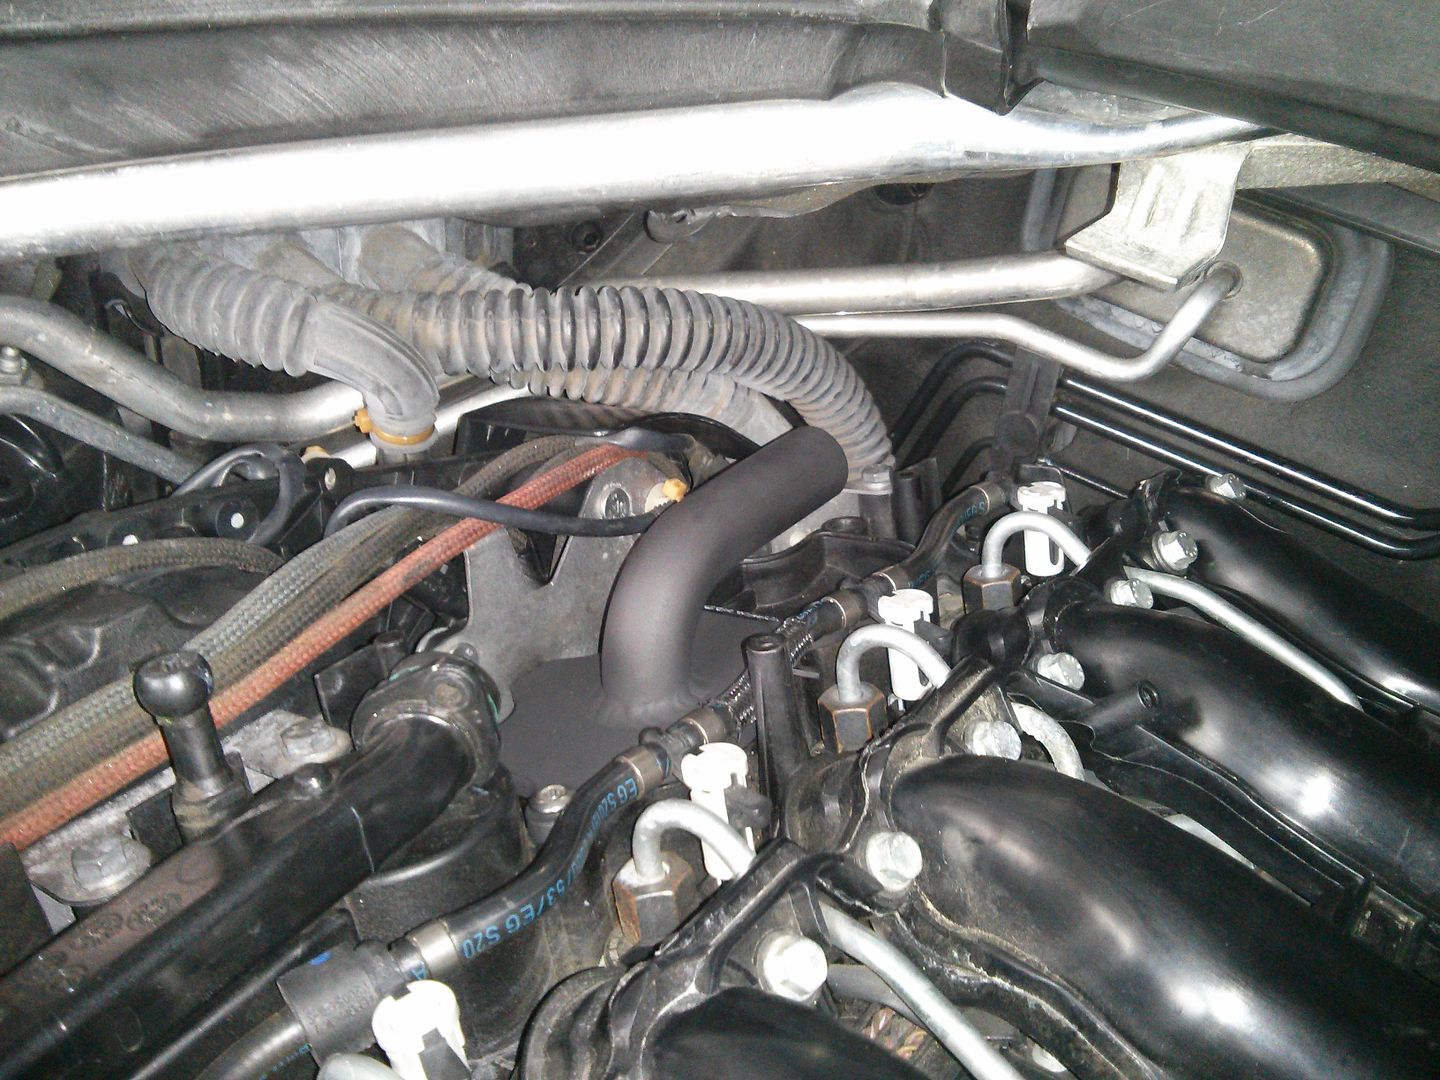
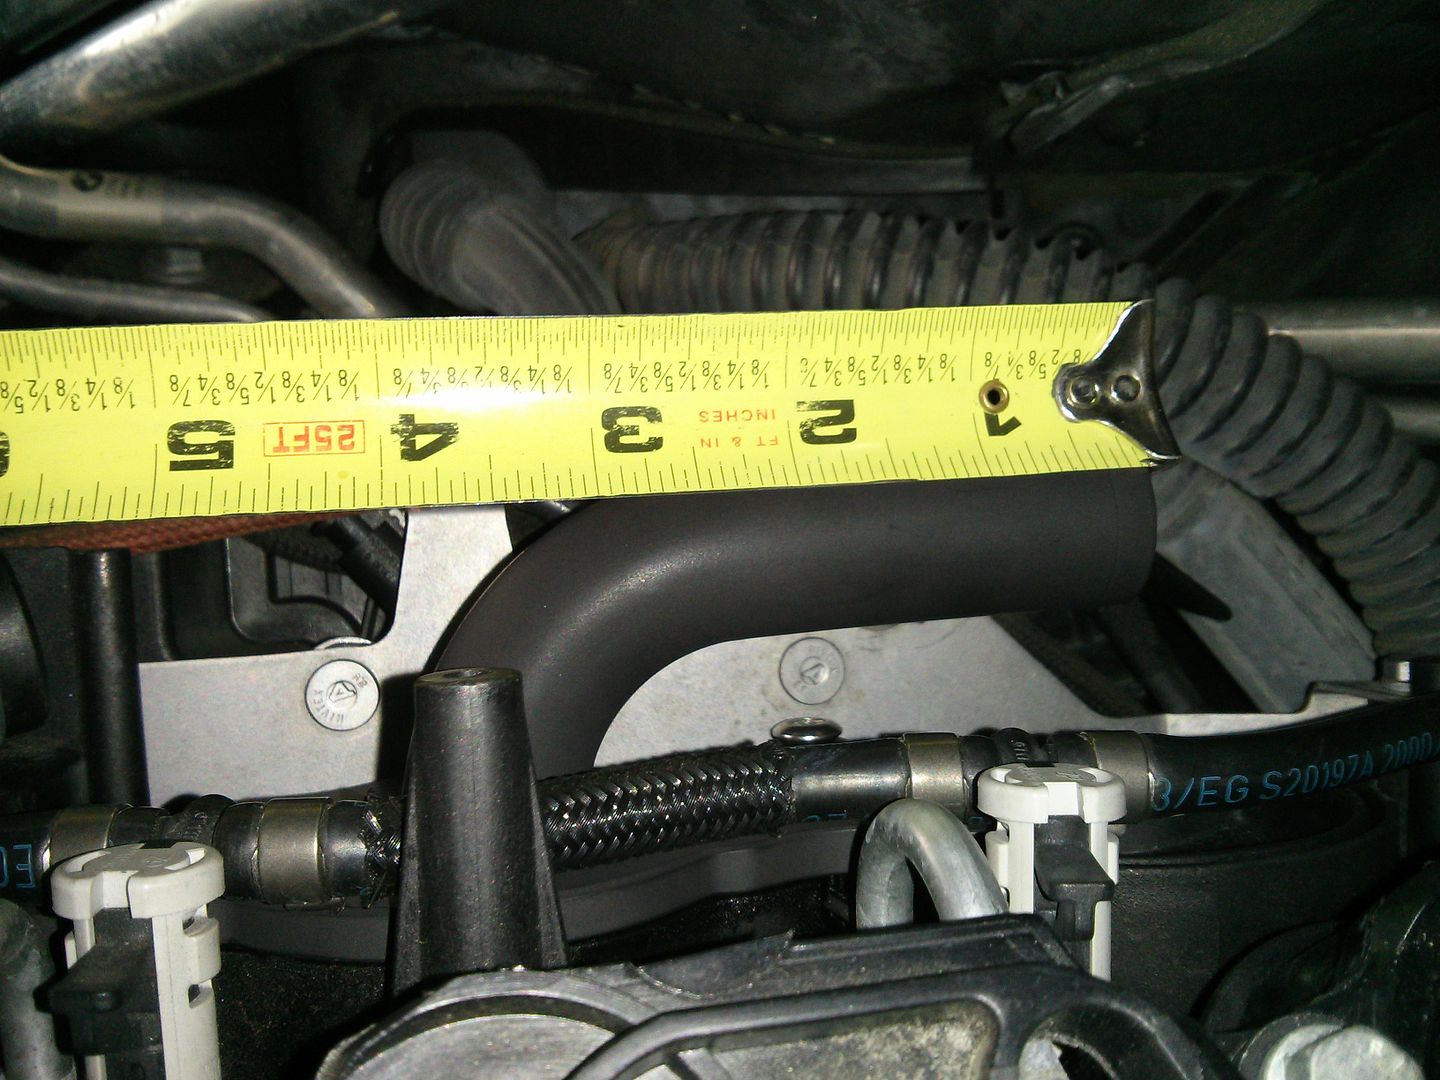
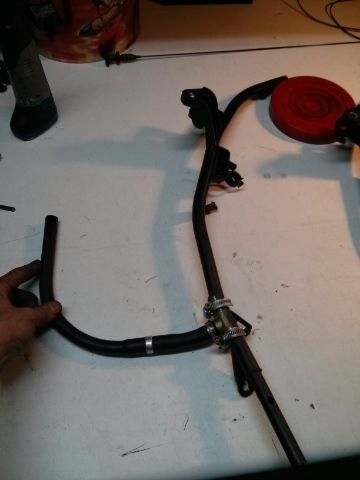
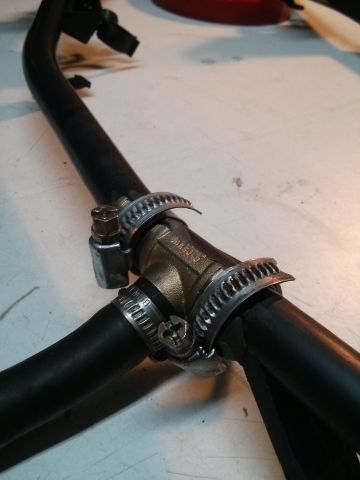
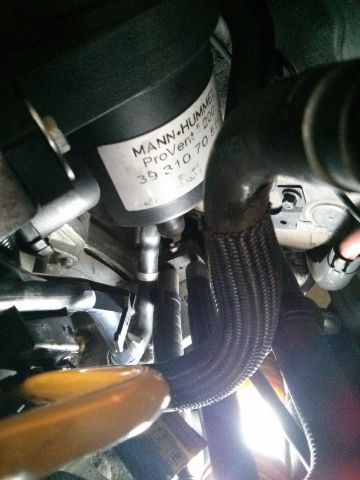
Well... FINALLY I found a place to put the Mann+Humme ProVent 200 in our tight engine bay. Here's a teaser:

Image


Stay tuned for some cool stuff:
1) Reroute the line going from the vacuum pump to the brake booster
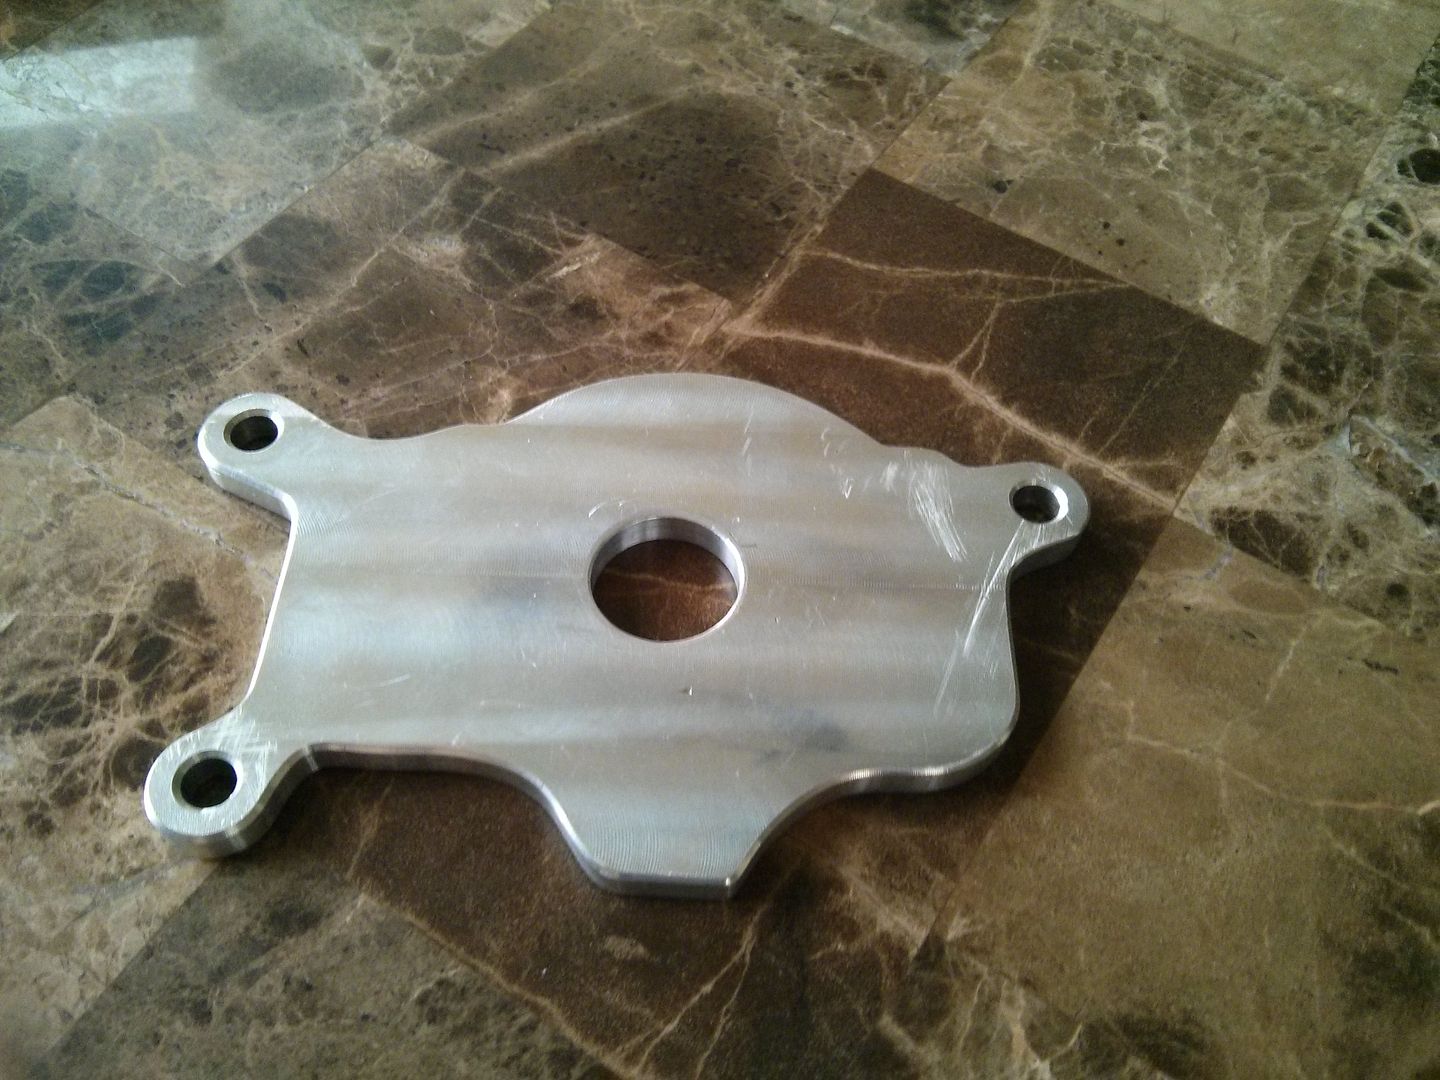
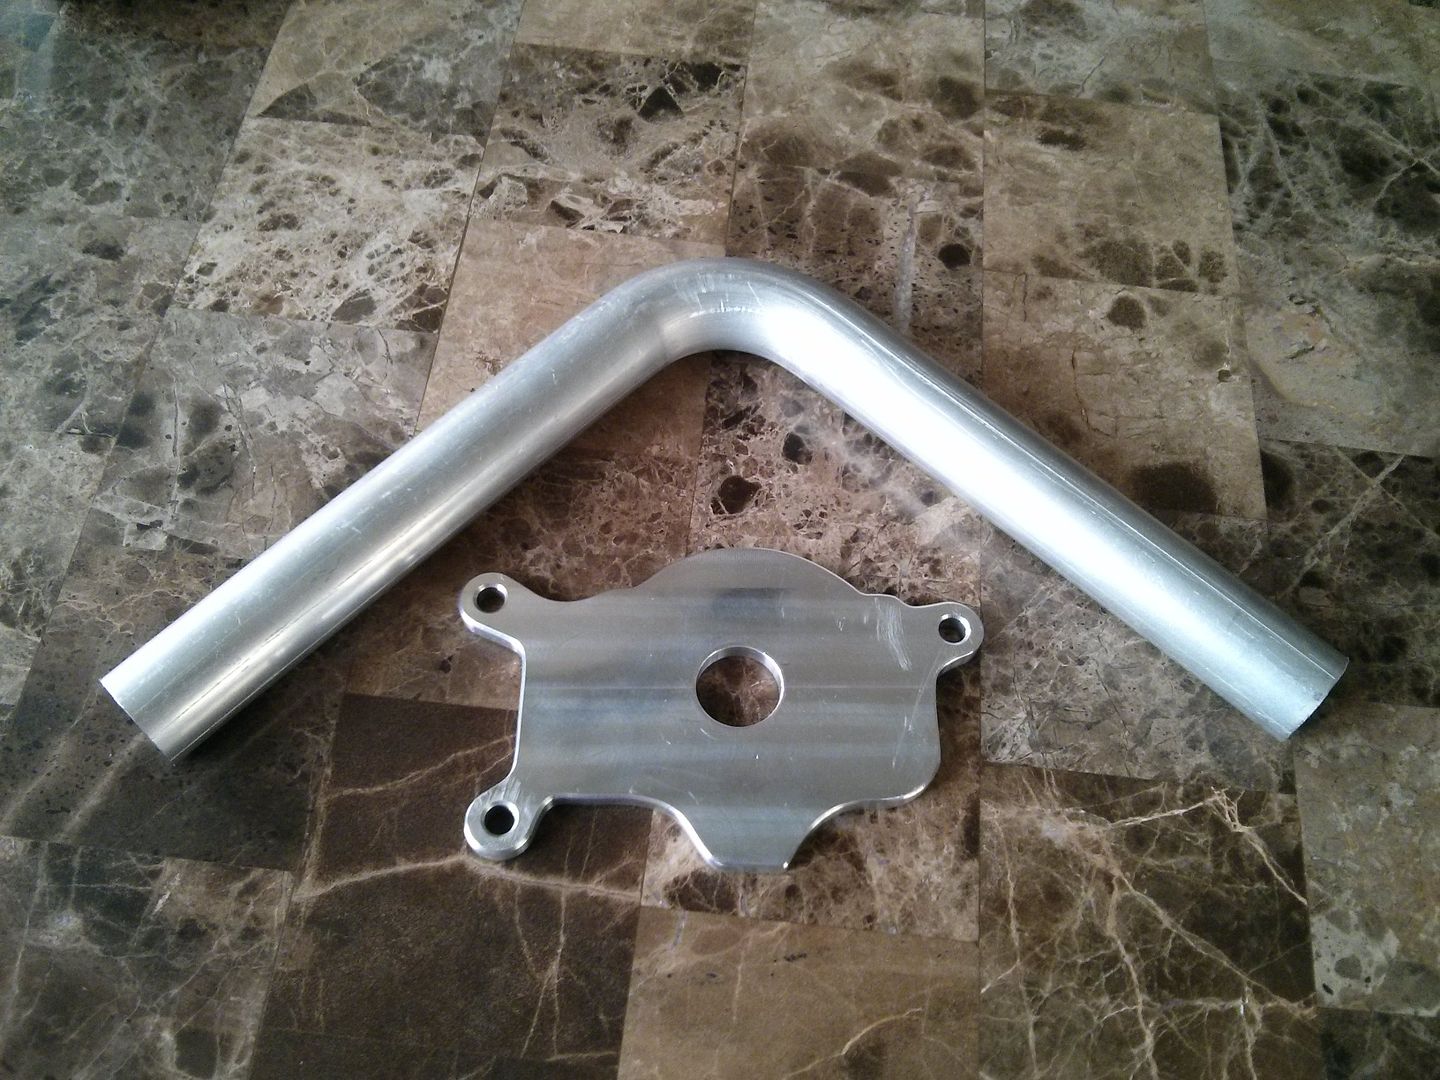
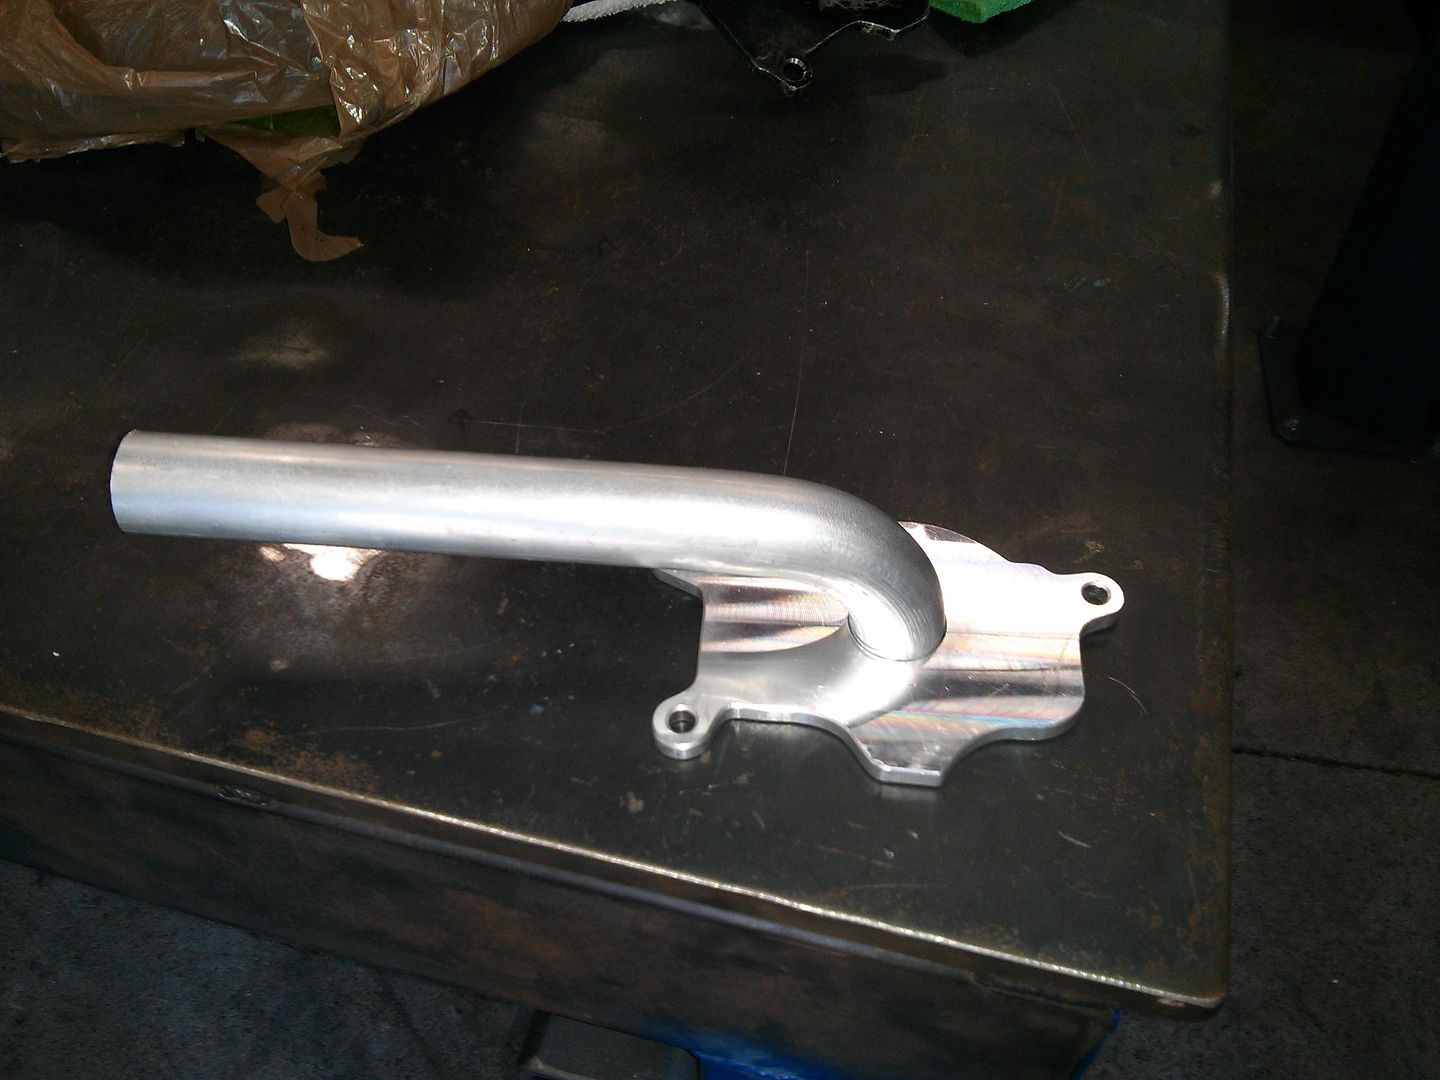
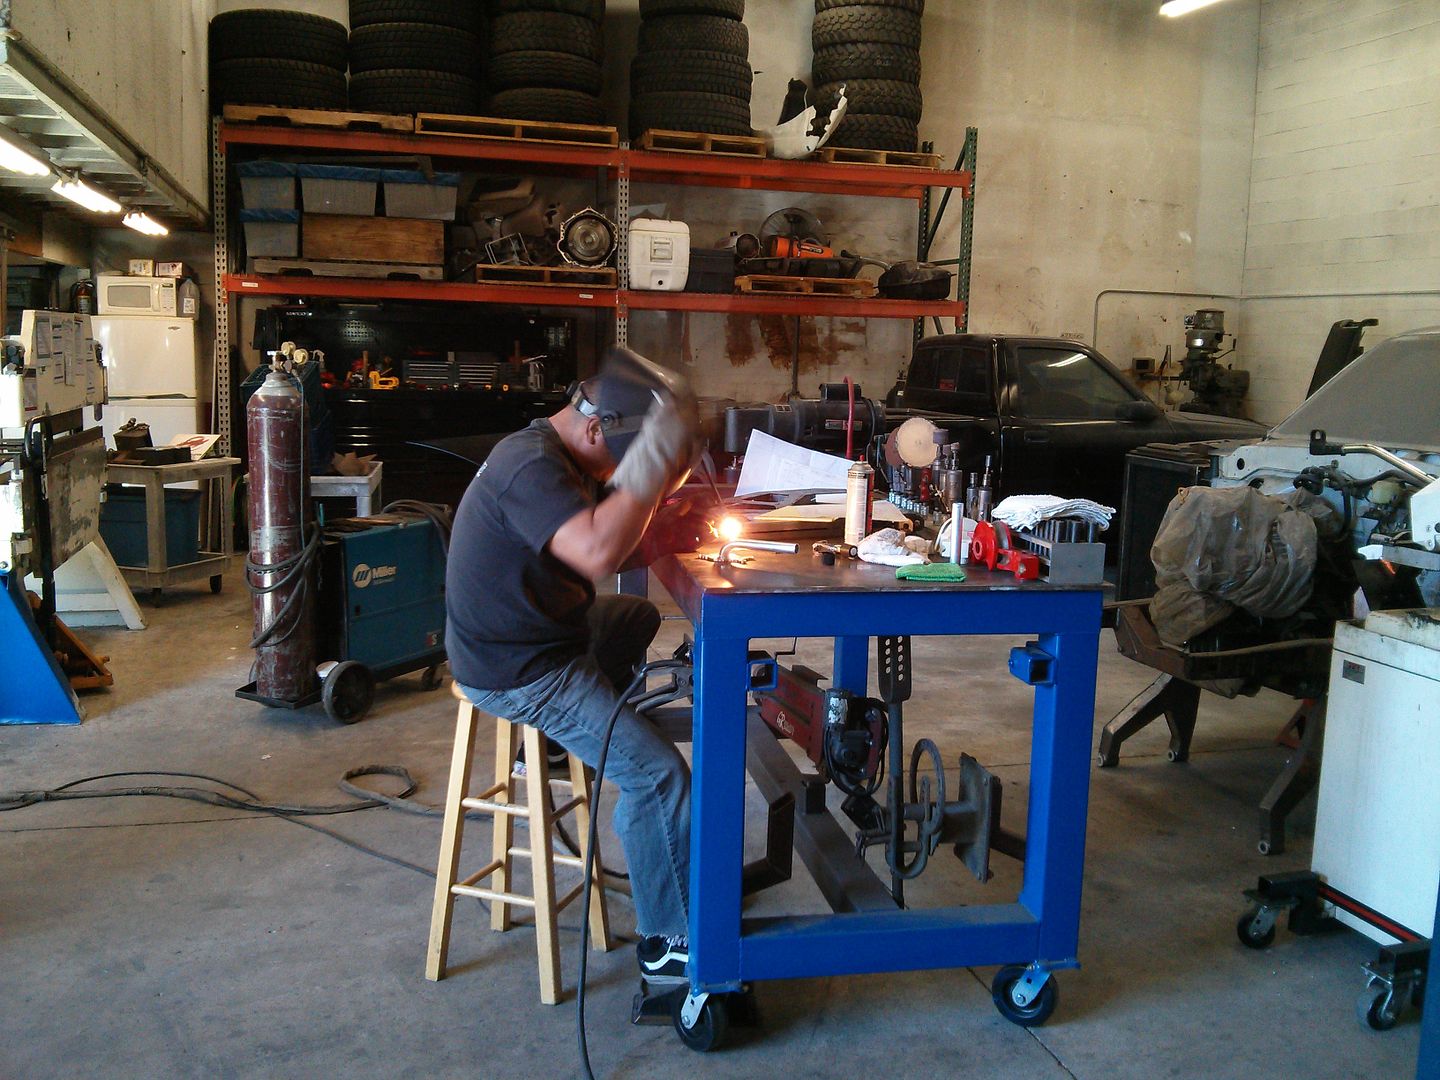
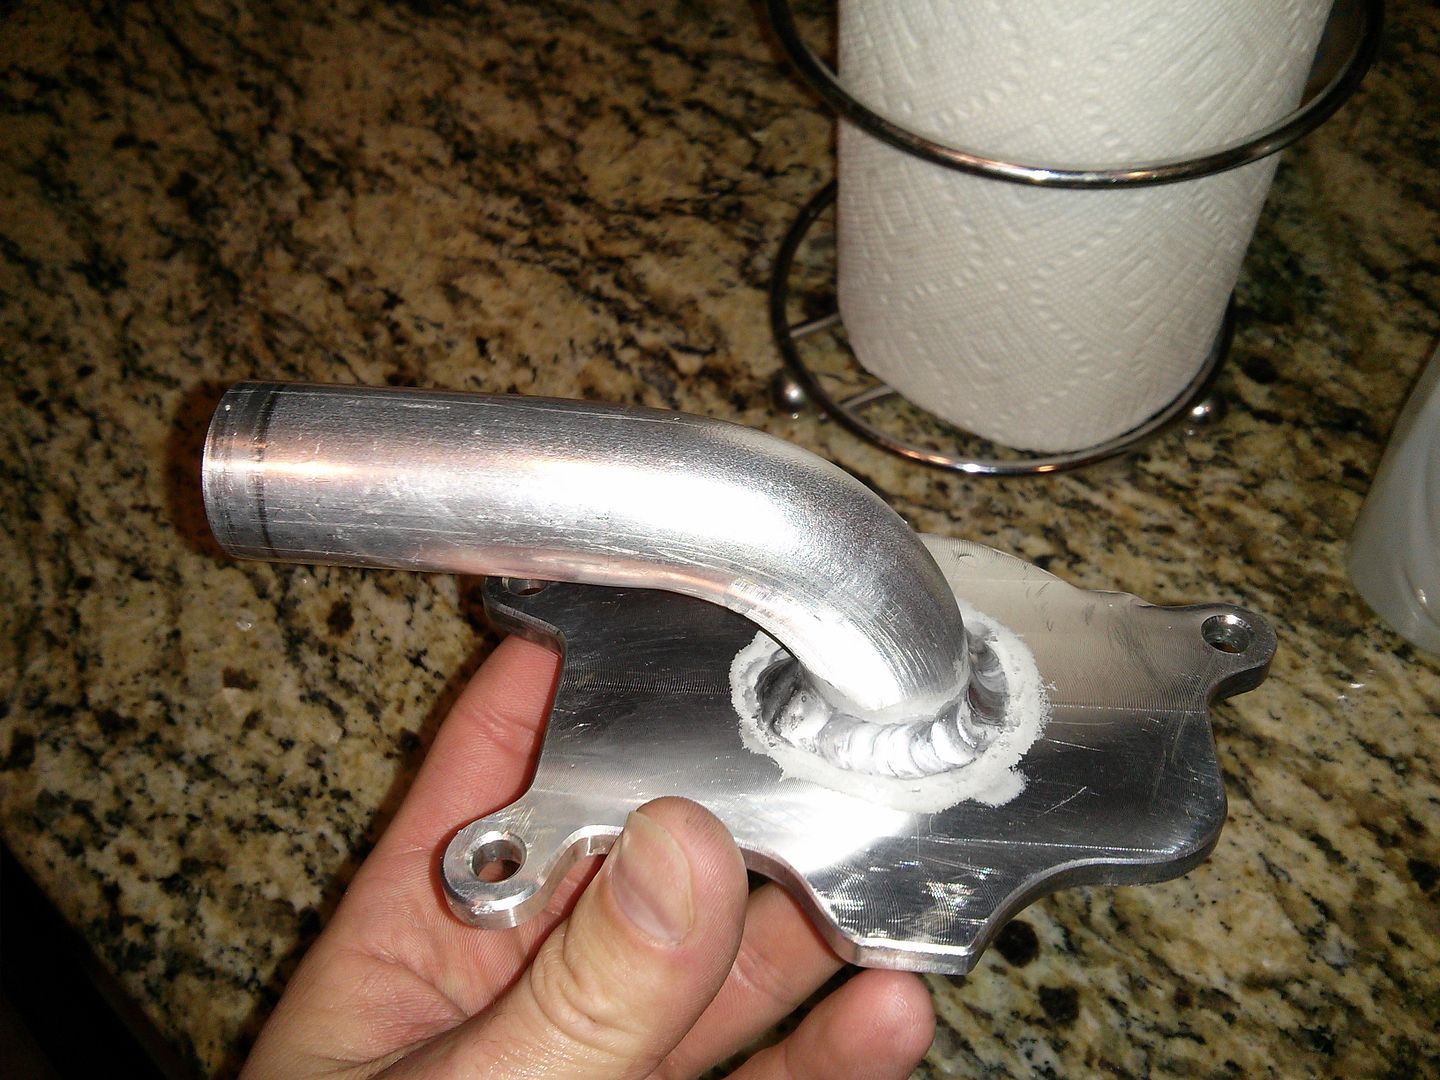
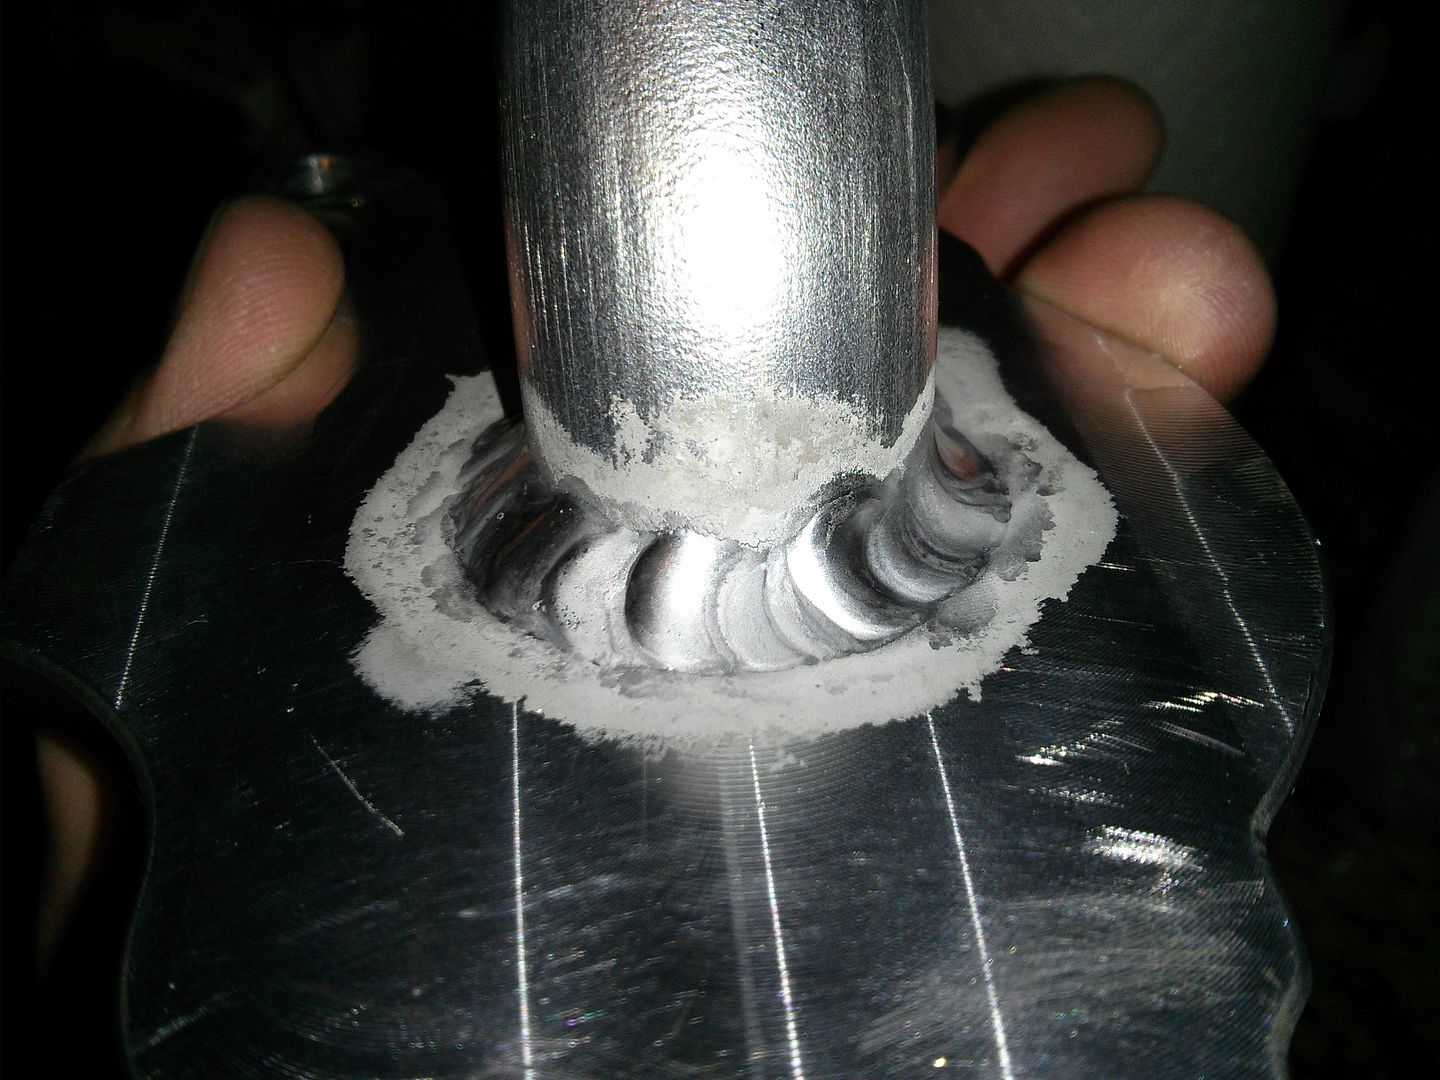
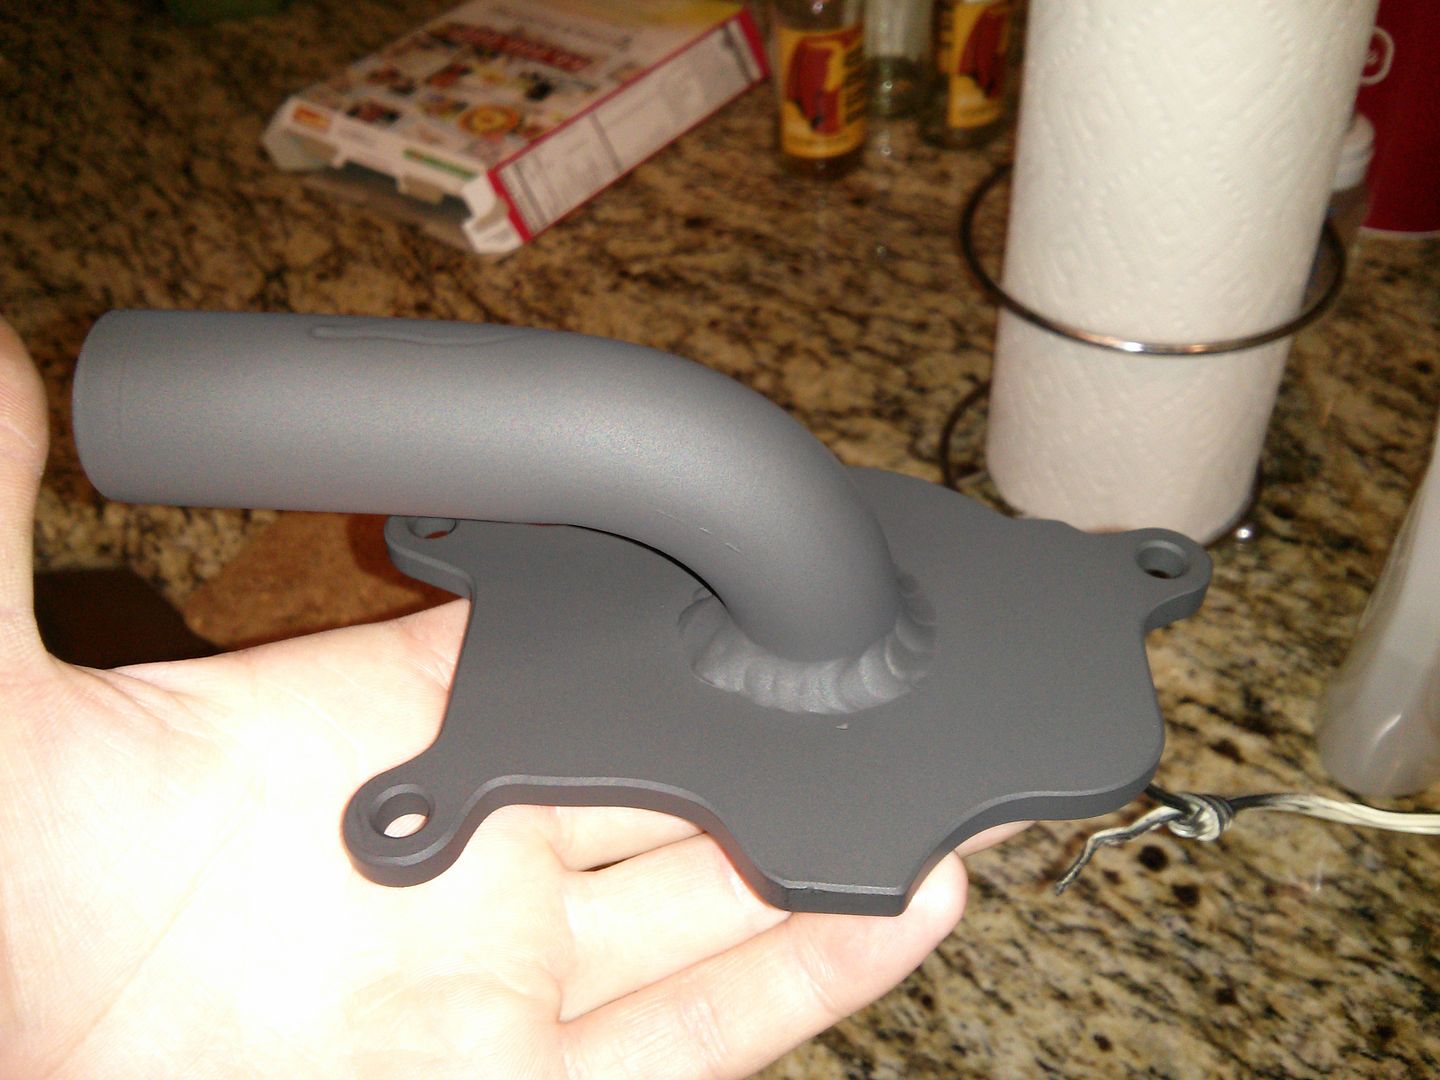
2) A "take off plate" that will replace the stock CCV and will allow me to route the blow-by to the Provent and back from the back of the engine
3) After proper testing, I'm planning on modifying the dipstick tube to use it as oil return line
 
#35 ·
LCapital,
Your DIY posts are pretty awesome. Thank you.
Could you, please, reiterate in simple terms the components (turbo, intercooler, ..) and how they are negatively affected by this oil seeping.
Are any emissions components affected?

I would like to keep my 35d for a long time. Turbo and emissions are the big things likely to fail before 120k miles. I am curious how this setup can help reduce the likelihood of those failures..
 
#36 · (Edited)
I'm not aware of any general turbo failure on the 35d or the EU counterpart of it; there was a particular version of the M57 that had premature failure of the turbo, but not ours. The emission components in general they appear to be a little bit more temperamental, particularly the SCR system.

As far as this mod, I've been reading around the diesel section and here quite a bit and it appears that a problem is the carbon buildup in the intake. People blame the EGR, I blame the oil coming through the intake via the PCV. Both when I replaced the thermostat and more recently when I cleaned the intake using the Liqui Moly Diesel intake cleaner (http://www.liqui-moly.com/liquimoly/web.nsf/id/li_pszi9clfqb.html) I noticed that while the inside of the EGR cooler is cover with a thin layer of very dry soot that easily wipes off, the intake is coated with a tar like substance that is stubborn to remove. My intake, for what I could see was not particularly nasty or clogged, but I could still dig out tar with a screw driver.

As the exhaust fumes from the EGR enter the intake they mix with the fumes from the PCV that contain oil mist (the oil that I now filter out of the fumes before they get to the intake) and results in the tar like substance.

A quick search on Google brings up pictures of M57 intakes that look like these:

Image
Image


Obviously if you remove the EGR you don't introduce soot in the intake, but here's a picture of the valves on an N54:

Image


What the N54 and the M57 have in common is only one thing: they both have oil introduced in the intake through the PCV. You clearly see the sparkling of the deposit that they are oily. The N54 is a gasoline engine, direct injection (that's why the valves get dirty, because you don't have the cleaning action of the gasoline sprayed on the valve that you have in manifold injection cars). In all fairness, it has a system called internal EGR (that uses cam overlap to achieve a certain exhaust gas re-circulation) and being direct injection does generates some soot: but both the EGR rate and soot are not even close to be comparable of a diesel engine. And yet the N54 has dirty oily valves (it's actually the result of the oil mist carbonizing on the hot surface of the valves).
 
#37 · (Edited)
Other report.

Total miles: 2,653
Total oil collected: 11oz

------------------------

I've run some additional crankcase pressure testing: I've installed my slack tube rig and drove the car over my regular commute of about 55 miles per day. Some surface street and some freeway. I didn't observe anything new, with crankcase pressure still very well manageable withing the ranges I've reported in the past.

I did an additional test buy connecting the slack tube manometer to a spare ProVent I had: the goal was to get a sense of what type of pressures would trigger the bypass to open. I plugged the in and out of the ProVent and connected the end of the slack tube manometer what would normally be open to atmospheric pressure to the oil drain. I then blew through the end that would normally be in the dipstick tube and observed the column of water to replicate what I would observe from my readings while driving. Before the bypass open I need to get to pressures that are about 4x - 5x greater than the max pressure I've observed while driving.

The bypass is designed to allow the release of fumes in the atmosphere should the crankcase pressure get to high: the fact that the max pressure I observe is 1/5 of what would trigger the bypass valve is another data point that the system is not affecting the engine in a negative way.
 
#38 ·
The other day I went to Lowe's and found what it turned out to be the perfect tee to make a saddle on the oil dipstick guide to drain the oil.

Link (the picture is not the right one): http://www.lowes.com/pd_125861-61002-APXT1112_0__?productId=3697658

Image


The tee is 1" x 1" x 1/2"

Using a jig saw I cut lenghtwise the 1" section; with some epoxy and some clamps to add strenght I attached it to the dipstick guide and once the epoxy cured I drilled through the 1/2" nipple to open the drain. Here's the final product:

Image
Image


What you see there along the rubber drain is a check valve that allows oil to drain but doesn't allow fumes to travel up the drain.

Image


There you have it: the loop is closed and now it's just long term testing...
 
#43 ·
This is incredible information! I almost get panicked inside if I need to leave the car idling for any length of time due to the intake issue(wife sits in the car on a hot day and sends me in the store to pick up a couple of things...).

If only I could pay someone to put this beautiful thing together for me the way LP has done.....


Sent from BimmerApp mobile app
2011 X5 35D
 
#44 ·
This is incredible information! I almost get panicked inside if I need to leave the car idling for any length of time due to the intake issue(wife sits in the car on a hot day and sends me in the store to pick up a couple of things...).

If only I could pay someone to put this beautiful thing together for me the way LP has done.....

Sent from BimmerApp mobile app
2011 X5 35D
Untrained wife = CBU
Let that be a lesson to us all. :)
Wives are there to run into the store while we sweat it out in the car with the engine off and no A/C. :)
 
#46 ·
So this is really interesting and it makes a lot of sense. I'm going to see what I can do to make this happen on my x5. I'm surprised but not surprised at the same time to know that the marketing and sales guys would probably be the ones to shut this filter idea down. In the not so long run you have a major "maintenance" issue with the carbon build up and not to mention the bad PR with so many people doing the research and scrambling to find out how to fix this.

Tragically this puts such an unnecessary bad name on diesels in this country at a time when we can least afford it. It's not just bmw either.... Most of the manufactures are doing the same thing and there is a really simple fix out for this problem.


Sent from BimmerApp mobile app
2011 X5 35D
 
#47 ·
So this is really interesting and it makes a lot of sense. I'm going to see what I can do to make this happen on my x5. I'm surprised but not surprised at the same time to know that the marketing and sales guys would probably be the ones to shut this filter idea down. In the not so long run you have a major "maintenance" issue with the carbon build up and not to mention the bad PR with so many people doing the research and scrambling to find out how to fix this.

Tragically this puts such an unnecessary bad name on diesels in this country at a time when we can least afford it. It's not just bmw either.... Most of the manufactures are doing the same thing and there is a really simple fix out for this problem.

Sent from BimmerApp mobile app
2011 X5 35D
It isn't my problem since I live in sunny San Diego, but BMW had issues in the past with the M54 whereby the cyclonic separator would freeze resulting in either cracked valve cover, blown rear mains or oil getting sucked up through the drain line resulting in bent rods.

To avoid these issues Parker Rakor has a heated sleeve that warms up the separator. A check valve on the oil return line would address syphoning issues.

The ProVent has a valve that vents the fumes in the atmosphere if the filter freezes... I think that is a non compliance with the EPA regs... But the solution would be an internal bypass valve whereby unfiltered fumes would go straight to the intake.

All and all there are issues to be solved, but I don't think they are insurmountable; I think is just sloppiness in the design of an important emission control system.
 
#51 · (Edited)
Yes, sorry for not replying earlier: I was planning to do a comprehensive update, but here in a nutshell, with more to come...

The ProVent is performing exceptionally: the intake is absolutely dry. I've check both the line going from the ProVent back to the intake and also removed the charge pipe in front of the throttle/EGR valve and there is absolutely no trace of oil. I'm extremely pleased with the results.

I have however an issue with the hoses I'm using which turned out to be too porous and oil perspires; this also cause a lingering smell whenever I parked the car in the garage. I'm in the process of replacing the hose and changing out the take-off plate with a better looking one.

Someone has been able to machine a plate and I bought an aluminum elbow to weld. Now I'm waiting for a friend to get back from vacation to TIG weld it for me. It should turn out a much better looking and stronger. My current plate has a copper elbow soldered to a plate I cut using a jig saw: it works well as a proof of concept, but doesn't look too pretty...

Image
Image
 
#52 ·
Incredible news to hear! This is a project I've got to tackle myself soon! Thanks for all the work you have put into this! Now if we could only get the manufacturers to pay attention to this and design this on their diesels from the start! We are already paying thousands more with all the emissions junk on the cars. All we need them to do is perform reliably from the factory.
 
#53 ·
Another great thread full of awesome info!!

On a side-note, how do y'all guys became so good at this. Did you just start this as hobby and did small jobs on your car and learned along the way or do you have a mechanical degree background or experience with cars? Just curious.

I would love to learn more about BMW diagnostics and did download some good reads. The first thing to start would be all the things needed for diagnostics like cable/sfotware etc. Any recommendation on which "package" to buy. I saw this one Enthusiast Kit at BavarianTechnic for $347.00.

http://www.bavariantechnic.com/buy.aspx

Let me know your thoughts. Thx.
 
#54 ·
Today I completed the plate. My proof-of-concept model was really not holding up: soldering copper with aluminum using a propane torch didn't really work and the seam was leaking.

But that's history.

Here's some WIP pix:

Image
Image


Here's the final product:

Image
Image
Image


I used a rattle can of flat black Rustoleum High Heat to finish it. That's after cleaning it with some acetone and warming it up in the oven at 170F. Since my wife loves me no matter what she let me use the oven in between coats...

Image


And the final product:

Image


I'm letting it dry overnight then tomorrow morning I'll put it all back together.

While I was there getting the thing welded a friend showed up who just got back from a little fishing. He had 2 25lbs yellowfins so we had a little sashimi:

Image
Image
 
#55 ·
Looks really good LP and it turned out really nice.Good job as usual!!:thumbup::thumbup:

Did you open up the .750" hole that i machined or elbow just fit right into the hole?Also please make sure that plate didn't get warp after welding.Otherwise it might not sit flush with the mating plate. I need to get that aluminium elbow too as its looks really nice.You are quite good in finding parts!!!!

I haven't touched my plate yet and its gonna be a summer project.In the mean time i will get the elbow and hoses from the same source you got.
 
#56 · (Edited)
Did you open up the .750" hole that i machined or elbow just fit right into the hole?Also please make sure that plate didn't get warp after welding.Otherwise it might not sit flush with the mating plate.
I did: I ended up offsetting it just a little bit towards the side with the arc (hopefully or males sense). The hole is 1 inch.

It did warp just so slightly but he resurfaced it so it's flat again.

I asked him about the cost of the mandrel bent aluminum elbow: he said unless you buy them in bulk $20 is a what they go for...
 
#58 ·
For the hoses I ended up using a length of heater hose I got from Napa. At $3 per foot is what I call cheap... I'm unsure if it is rated for oil or not or if it will deteriorate but if it does we'll cross that bridge when needed.

Given the mounting position I've chosen the two pieces are 23" and 29.5" long respectively

Image


Here's also a couple of picture of the plate installed showing how long the tangent needs to be.

Image
Image
 
#61 ·
Oily intake

Kudos to LPCapital for this thread. I'm still trying to find time to order and install a Pro-vent or similar PCV oil separator. At 110K miles I've had to change MAP and now throttle servo unit. Had I (or BMW) installed a proper separator to begin with, it's unlikely either would have been necessary.
 
#62 · (Edited)
For overall information as you prepare to work on this, be aware that lpcapital/zetatre cross-posted this information at xoutpost. In particular, some modifications with regard to tubing/supplies/brake line routing are discussed starting at about post #20. The link is here: http://www.xoutpost.com/bmw-sav-for...av-forums/x5-e70-forum/97266-35d-adding-crankcase-breather-oil-separator-2.html

Just to add to your experience, I also had to replace my throttle servo motor (anti-shudder valve) due to carbon/oil build up, and changed my MAP sensor as pre-emptive maintenance.

Hope that helps. Good luck.

Stephen
 
#63 ·
So far none of the tubing I used have held up: they all get damaged more or less slowly by the oil.

I resorted to spend the money and bought the one from Patrick Motorsports that sgrice talks about on the xoutpost link. UPS will deliver them Friday.

Other than that the system continue to work extremely well. Any oil consumption i had before has entirely disappeared and there's essentially no oil deposited in the intake. Carbon on the EGR valve is a very thin coat and dry.

Sent from my Nexus 7 using Tapatalk
 
Status
Not open for further replies.
You have insufficient privileges to reply here.