BMW Forum - BimmerFest BMW Forums banner

Stuck Ball Joint?

1 reading
36K views 14 replies 9 participants last post by  fred530xi  
#1 ·
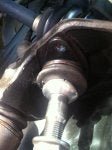
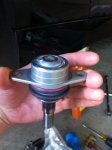
I have read through most of the DIY threads on here in an attempt to find why I cant get the ball joint closest to the wheel hub separated from the hub. Does anyone have any little tricks for this? So far I have spent about an hour with a crowbar (Thats how I got the other one out), trying to pry it out, but it hasnt done a damn thing. Both sides are doing this. Other ball-joint came out fairly easy, what gives?
 
#2 ·
Ok, after round two and using a pickle wrench (Or fork bar, however you would like to word it) The only thing I have managed to do is rip the ball joint casing. I dont really care, cause I have new control arms and ball joints anyway, but I do desperately need to get these off! Does ANYONE have any ideas?
 
#6 ·
Get the "pickle fork" out again, and hammer it on to put pressure on the joint.

Then smack the hammer against the OUTSIDE of the steering knuckle that it's stuck in, right hard and right next to the offending ball joint stud. This will pop the assembly apart instantly, as it slightly deforms the female side of the taper-lock. When you torque the new one in, everything is perfectly round again and seats as it should.

Best of luck!

P.S. - A good soaking an hour or so before with Kroil or PB Blaster couldn't hurt.
 
Save
#7 ·
Exactly what I was going to say. Typically I deal with a lot of one-off prototype parts for ball joints and I can not afford to dammage the boots. I usually loosen the nut, and then place one ball peen hammer on the knuckle and then stick it with another hammer. Sometimes it takes a few really good wacks, but it'll eventually pop.
 
#8 ·
Thats what I eventually ended up doing. I actually broke two pickle forks in the process though. They were bent in there due to the control arm bushing being gone, a lot of the force that was usually absorbed must have been transfered to the ball joints and made them a complete nightmare. Anyway, thanks for the replies :)
 
#9 ·
E60 530xi Tension Strut Ball Joint Removal

My 2006 530Xi had severely stuck/corroded tension strut ball joints and none of the other advice worked, including the Bentley manual or recommendations from a BMW mechanic. What finally worked was using the ball joint threads to draw out the ball joint. Keep in mind this may only apply for the AWD versions.

Here are the steps that finally worked...

1. remove engine lower splash cover.
2. remove splash cover at the frame end of the tension strut.
3. remove nut from the ball joint side of the tension strut (i had to use a cheater bar).
4. tap or gently pry the tension strut off the ball joint (there is just a conical shaped interface so this step is relatively easy)
4. remove the two torx screws holding the ball joint to the steering knuckle
5. place the tension strut back on the ball joint, but only just so it exposes enough threads to get the nut started again
6. find something from your shop to use as a ~3/4" spacer between the tension strut and steering knuckle (I used a nut and a few large washers, and I would recommend adding a piece of hard rubber or plastic on the tension strut side to protect the soft aluminum strut. Also on the passenger side I put the front torx screw partly back in to create a decent surface to push on with my spacer)
7. place your spacer between the tension strut and steering knuckle (draw an imaginary line between the ball joint and tension strut bushing and place your spacer along that line to minimize moment in the next step. There is no perfectly flat surface, but its close enough)
8. put a washer and the old nut on the ball joint threads (once again the washer is to protect the soft aluminum strut from surface damage)
9. tighten the nut until the ball joint draws out of the steering knuckle (I used a cheater bar again)
10. Celebrate with a cold beer.

The other methods that didn't work.
-slide hammer
-soaking in pb blaster and hammer and chisel to break it free
-20 minutes with a heat gun on the knuckle and then the keyboard air duster held upside down to freeze the ball joint
-cursing

BEST OF LUCK!
 

Attachments

#10 ·
One more thing. When you start the ball joint nut you may have to hold the ball joint from turning with a torx socket. I recommend lubricating the ball joint threads to minimize this effect.
 
#11 ·
I'm having the same issue - seized ball joint not budging. I was thinking of taking a chisel or a screw driver and hammer and hit it as hard as I could in the direction shown in the attached pic. Hitting on the plate of the ball joint and causing it to turn and hopefully releasing it! Do you guys think that's a good idea and whether that might work!
 

Attachments

#12 · (Edited)
Does this diagram help?

Hoss, maybe this is more clear? Just be careful to put something soft like rubber between the spacer and the control arm as you don't want to deform the aluminum and create a stress riser. Also put a washer between the nut and control arm to protect it from damage when the nut turns and is applying load. The hub is steel and is much more resistant to damage.
 
#15 ·
Hoss, maybe this is more clear? Just be careful to put something soft like rubber between the spacer and the control arm as you don't want to deform the aluminum and create a stress riser. Also put a washer between the nut and control arm to protect it from damage when the nut turns and is applying load. The hub is steel and is much more resistant to damage.
View attachment 439498
This post helped me remove the ball joints yesterday! Since I was replacing the control/tension arms anyway I used two bolts as the spacer this post is describing.

I went to Lowes and picked up a mix of M10x1.5 hex bolts of varying lengths. The 40mm long bolts worked for me.

After removing the control arm nut from the ball joint, I removed the two torx bolts holding the ball joint in place. I then installed the 2-40mm bolts in place leaving about half the bolt exposed. I then re-installed the control arm onto the ball joint. The ball joint did not just pop out, but after a couple hits from the top of the joint it came right out.

Note: I had NEW control arms to install so I was not concerned about damaging the old ones using this technique.

Now I need an alignment! Good luck!
 
#13 ·
Sean, thank you o much for the reply! Yes, the diagram is perfect and makes everything very clear. I am happy this method worked for you and it's very clever of you to come up with it. I will definitely try it next time I have the car up on jack stands. For now, I put everything back together... just changed the control arms and kept the old ball joints. It drives much nicer than before but I think the ball joints will not last very long and need to be replaced soon. Thanks again.
 
You have insufficient privileges to reply here.