BMW Forum - BimmerFest BMW Forums banner

Cooling System Overhaul: my diy experience

37K views 31 replies 14 participants last post by  GREGORIVS  
#1 ·
Here's my side of the story on the feared COOLING SYSTEM OVERHAUL. If you "fear" on doing the overhaul like I did, fear no more it is really not that hard to do. paying for the parts should be the scariest part of it. :yikes:

Parts that I bought:
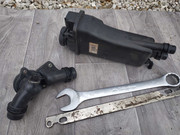
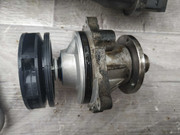
Belts, HEPU WP, wp pulley (metal), thermostat and both hoses that connect to it, sec. aux fan sensor, fan blade, fan clutch, bleeding screws and both mechanical tensioners. Also bought 2 gal. of BMW antifreeze and 2 gal. of destilled water. I had changed the expansion tank, all 3 hoses that connect to it and the cap previously.

Tools used:
1/4" ratchet, 3/8" ratchet, phillips and flat head screw drivers.
socket sizes: 8mm, 10mm, 13mm, torx T-50
wrenches: 13mm, 32mm.
A piece of 1"dia. pipe for leverage and "lok-cease 20/20" anti-seize lubricant to put on the threads and o-rings. may be something else that escapes from my mind right now.

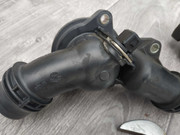
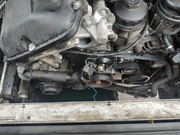
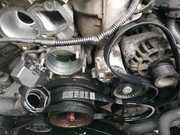
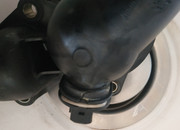
First thing I did was to raise the car and secure it. then removed the splash guard and drained the coolant from the radiator at the drain plug. then disconnected the hoses from the electric wp and the expansion tank, that drained even more coolant. removed the fan with the dead blow hammer and 32mm wrench. removed the clips from the fan shroud and disconnected the little hose that goes from the expansion tank to the radiator. pulled out the shroud and fan. than removed both of the hoses connected to the thermostat.
besides the sensors that you need to disconnect from now on it is just bolts that you gotta remove to change out the parts. Installing it just the reverse way of the removal, i think.

notes:
I used 60/40 anti freeze/water ratio because of the heat in So. Cal. i plan to drain and fill again this weekend 'cause i only used 1 gal. of antifreeze.
 

Attachments

#3 ·
Nice - I'm dealing with the fan clutch seizing right now and couldn't get it off with just a blow hammer so I have to wait until I get the right tool from ZDMAK, hopefully tomorrow. How did you flush/bleed/fill the coolant into the system?
 
#5 ·
1. Spray WD-40 on the backside of the Fan Clutch Nut.
This is where it mates with the WP threads.

2. FYI, when I last did my cooling overhaul in 2006, I apply a bit of anti-seize on the Fan Clutch Nut, foru (4) years later, removing it is a breeze (I needed to remove it for the Oil Filter Housing gasket DIY).
So do not forget anti-seize when re-installing it.
 
#6 ·
to aa240sx:
standing in front of the car, on the bottom right corner of the radiator is the drain plug, just unscrew it and take the cap off the expansion tank to let the coolant drain. also as you take off hoses, coolant will come out.
I filled through the expansion tank. once filled, let the car idle until gets to operating temp, turn it off, let it cool for 1/2 hour then let the air bleed off from the bleeding screws. I repeated this process like 3 times.
 
#8 ·
yes you need to remove the splash guard then crawl underneath and remove the hoses from the expansion tank, the electric wp and the clips on the shroud that hold the hoses. there are 2 hoses connected to the expansion tank: the one in the right goes to the elec. wp and the one on the left goes somewhere else on the side of the car. both of them are hold by the clips on the shroud.
 
#9 ·
To clarify - I'm not trying to remove the shroud or even do a full or semi full cooling systems overhaul right now. Most of my parts won't come for a few more days. I just want to be able to lift the shroud maybe 3-6 inches, clear the space needed, so I can remove the busted fan/fan clutch. Truth be told if there was a way to remove the fan/fan clutch without touching the fan shroud, I would prefer that method, but I don't think that can be done.

Looks like I've got a little more work ahead of me.
 
#10 ·
In my case, my fan shroud has a small crack at the TOP.
I just use a "coping saw" (the same saw carpenters use for fine wood work), cut a small area along the TOP part of the Fan Shroud, my Fan Clutch comes out easily without removing anything.

The design of BMW is that the space between fan shroud and the tstat housing is so tight that a fan clutch-fan blade combo cannot come out with the fan shroud in place.
 
#11 ·
Done! Dealer charge - 670 Indy Charge - 305, ZDMak tool 35 bucks plus 90 for a Meyle Fan Clutch from SD Europarts - 125!

Followed DIY's from Beisan and CN90 fairly closely. I was able to do the job without getting underneath the car. The lower right side hoses can actually be reached from the top. Just loosened them from clips. This gave me just enough wiggle room to free the fan/fan clutch. Fan was fine, just unthreaded three bolts from busted fan clutch. Put old fan on new clutch fan, placed assembly back in (didn't use floss method but only took a couple tries to get clutch back on wp). tightened everything back up, started engine and no more rough idle.

On to the rest of the cooling overhaul!
 
#14 · (Edited)
I'm just reading different DIYs on the cooling system to get a better understanding of things. But there is one thing that I quite don't understand. Is there a water pump and then an electrical wp? Or are they the same thing. Sorry for the newbness

I see that you switched from mechanical tensioners to the hydraulics tensioners. Was it as easy as unbolting the old tensioner and bolting up the new one?
 
#15 ·
Yes. The electrical water pump comes into play when you are filling up and bleeding your system. This is why you will need to put the key in the accessory position while filling the empty cooling system (with heat on high) with coolant. You will hear it pump the fluid through the system and suck up the coolant as you slowly fill it up. Whatever you do, do not rush the bleeding process - very critical to avoid air pockets.

Tensioners are a simple bolt in whether they are mechanical or hydraulic. Tensioners can be replaced without removing anything from the car other than unbolting the fanclutch/fan and laying it back against the radiator. There is sufficient clearance to replace all of the tensioners this way if one so desires.
 
#22 ·
#24 · (Edited)
#31 ·
Hello,

first of all I'm sorry if I'm posting here and if I shouldn't but I didn't feel like starting another thread.

I got a 2000 E39 530i and I got error 7B 123 characteristic signal cooling from BMW Scanner 1.4

To me the car is normal, I guess that the electrical component on the thermostat is not fince but the mechanical part is.

I am going to change the thermostat and I got a few questions :

The torque for the thermostat bolts is 10 Nm, right ?

What kind of grease and where should I put it ?

Is it necessary to have the 2 tools to remove the fan from the water pump or is it possible to remove the fan from the clutch instead ?

Thanks.
 
#32 · (Edited)
My experience is that :

Remember to unplug the electric pump and to slide it out of the socket from below.

You have a better general view anyway if you remove the plastic protection below the car.

I broke a plug from the expansion tank trying to remove the permanent clamp.

You can make your own tool to remove the fan, not need to buy and wait for the cheap ones from internet.

I ordered :

HELLA - 8MA 376 731-501 expansion tank

GATES - K116PK1540 belts and pulley kit

MAHLE Aftermarket - TM 13 97

Hepu P472 water pump

Both thermostat and expansion tank were from 2000 in my car and the pump was replaced by a valeo.

The DME was right, I got error 7B 123, characteristic MAP cooling, shortcircuit to negative. I found that the thermostat was cracked close to the electric part and that some liquid went out. I guess it created electric problems.

Image