BMW Forum - BimmerFest BMW Forums banner

Fuel filter 2001 530i DIY

58K views 37 replies 22 participants last post by  Aussie528iT  
#1 ·
Searched the database for a fuel filter replacement DIY.
I thought this might be a good Maintenance procedure.
My guess I should get BMW fuel filter (rather than Mahle) with internal pressure regulator.

13321709535 Part number ECS Tuning

Recommendations?
 
#2 ·
I did about ayear or two ago.
Get also some new fuel lines (rubber hoses) and screw-on hose clamps with rounded edges, so you don't cut the rubber lines.
Autohausaz has some decent ones.
Turn on the engine and let it run, then pull the fuse from the fuel pump. There will still be some pressure left in the filter and hoses.
Rather than pulling on those rubber hoses after you remove the original hose clamps, you're better off cutting them (pay attention how you do it) to remove. The rubber at this age is hard and will not slide off.
Make sure you don't mount the filter backwards, and that's it.
P.S. wear safety goggles - there will still be some fuel under pressure, and don't smoke.

That's it and GL
 
#9 ·
About the same, but then my car was running great all the time. I did because of mileage - about 70k miles.

"I did about ayear or two ago.

Turn on the engine and let it run, then pull the fuse from the fuel pump. There will still be some pressure left in the filter and hoses."

I am about to do the same job, and I like your idea about pulling the fuse to reduce fuel line pressure. Would you happen to know which fuse it is?

Thanks.
I cannot remeber exactly, but I believe it was in the trunk where the battery compartiment is. There should be a sheet somwhere to identify it. It was awhile ago.

Donna, that M5 is not exactly like our cars, and the older one for the 540 is the closest you can get.
However, there are 2 different types of fuel filter pre and post 2001 (2000 maybe?). The post facelift have the regulator built in and are a tad more expensive, but you kill 2 birds with one stone.
The pre-facelift ones have the cheaper one witout the regulator. The regulator for those is located in the engine compartiment. Not sure if you have to change the regulator as well on these cars?
 
#4 ·
"I did about ayear or two ago.

Turn on the engine and let it run, then pull the fuse from the fuel pump. There will still be some pressure left in the filter and hoses."


I am about to do the same job, and I like your idea about pulling the fuse to reduce fuel line pressure. Would you happen to know which fuse it is?

Thanks.
 
#5 ·
I used to run the engine without the pump fuse on my cars and then decided it's a waste of time. Fuel pressure is still there, you still spill fuel and so i decided to skip this step. If you're replacing the hoses just cut a notch in one and relieve the fuel pressure into a little container. Simple and clean. Then after it all just drips out, complete the job.


Otherwise you're adding 50% more work and procedures for 10% benefit, if that.
 
#7 ·
Searched the database for a fuel filter replacement DIY.
I have not done my fuel filter (90K miles) yet but I too was surprised that a search of "E39 fuel filter DIY" turned up a paucity of hits.

In the bestlinks thread, there (was) only one hit:
- Inspection II part III: Water pump, thermostat, belts, hoses, fuel filter

The rather lackluster results of the bimmerfest search are as follows:
- Locating the 2002 525i fuel filter
- How to change fuel filter? Please help....
- Fuel Filter Change!

The M5 guys seem to have a fuel filter DIY:
- Fuel Filter install DIY, observations and tips

So I added all these to the bestlinks thread but ... really ... isn't there a better fuel filter DIY existent?

Image
 

Attachments

#10 ·
I don't know about all these tricks to release the "fuel pressure". I did nothing of that.

Also, no need to cut anything.

I removed the fuel filter, without removing any fuses. Just parked my car, lifted the front driver side, and removed the filter. A very little amount came out, what you would expect that is left in the skinny fuel line. Probably less than half a cup.

Don't cut any rubbers. DON'T PULL on the rubber hose to remove it from the filter. Instead, use a flat head screwdriver. Put it in between the filter and the end of the rubber hose, and PUSH it out, using the flat head as a leverage.

I bought all kind of clamps to squeeze the rubber hoses on both sides of filter to close them in order to stop the fuel from "coming forcefully out". Didn't even used them. Pretty much close to nothing came out anyway.

So. Is that a turtle head in your x ray??? It's definitely not a lobster or a blue crap claw. :dunno:

mw
 
#14 ·
Just did mine. Had to cut off the clamps. With 130k miles the hoses were in surprisingly good shape, but heck while your there you may as well replace them, it's only three 2" pieces of hose and 6 little clamps. If nothing else it's peace of mind.

Oh! If yours has the regulator built in don't forget to mark which fuel line goes where, in case your interrupted.
 
#18 ·
fuel filter

Am going to do this job soon and have read a few diy's with differing methods. I have a couple of questions I was hoping someone could answer
1. Do you need a special tool to remove the hose clamps?
2. If so is it best to cut the clamps and buy some Norma fuel line clamps (made in Germany) and if so what size, I note that Realoem have the hose size as 8x13mm. Clamps come in sizes like 12-14mm / 11-13mm ect.
3. If replacing the 3 pieces of flexible fuel line should you buy BMW or will any high pressure fuel hose do?

Bare in mind a metre of the BMW fuel hose over here is $125 !

Cheers

Glen.
 
#21 ·
Question to those who did this: I also looking for 8x13mm hoses... They are kind of expensive from online sites, which generic one can I use? What pressure should they keep?

Thanks!

...
I note that Realoem have the hose size as 8x13mm. Clamps come in sizes like 12-14mm / 11-13mm ect.

3. If replacing the 3 pieces of flexible fuel line should you buy BMW or will any high pressure fuel hose do?

Bare in mind a metre of the BMW fuel hose over here is $125 !

Cheers

Glen.
 
#19 ·
Im about to change out my fuel filter as well, and I have ordered a Mahle filter, but how much fuel hose should i order to do the job. I would look, but I work offshore and id like to have the parts ready to go once i get home. also, I take it I should be able to reuse all the clasps if i take my time and dont brake anything.
 
#20 ·
Just for reference to the OP, here are some pics of a filter change on an '01 530i. I had intended to write up a DIY, but didn't think it would add much to those out there, and was also pleasantly surprised how simple the job. Bit of frustration with the 'stubbornity' of the old hoses. Didn't notice any real diff in MPG or performance, but felt better at 130K miles.
 

Attachments

#32 · (Edited)
Papabear, have you had any issues with those hoseclamps? I'm going out to tighten mine for the 3rd time, tonight. They keep loosening and leaking fuel. I've heard about a different kind of screw clamp, but autozone by me doesn't sell them. The do carry self clamping, but I don't think they would be strong enough. The OEM are crimp.

I didn't realize there was fuel hose clamps and used regular clamps like you. Guy at autozone told me there is only one kind of clamp. Right.

There are normal fuel line clamps with crimper for about $60. It's a consideration, but was thinking of something like these (disregard size-just example of clamp).

http://shop.advanceautoparts.com/we...jection-Hose-Clamp-(4-Pack)-Autocraft_89016085-P_N3055_A|GRP2014____#fragment-3
 
#24 ·
That what I'm going to do today LOL

Found 180 PSI multi-injection hose in O'Reillys, also will buy clamps there. This will be all parts for upcoming weekend. Hopefully after that it will be driveable again...
 
#26 ·
5/16" ID hose should be correct. The OD of that hose should be close to 9/16".

The fuel pump is on top of the fuel tank, so I don't think the tank will drain if the hose is disconnected, but you should find some way to plug the line just to make sure.
 
#27 ·
Took me 4 hours, including a 1 mile walk to/from autozone for 5/16" fuel line (vs. the 1/4" I bought). A lot of it was the unknown and thinking what if this/that. I did NOT like working with the gas everywhere. Lol. At one point, but before any gas had come up, I was using a screwdriver to try and pry the hose off. It slipped and hit the old c-clamp and I could definitely see a good spark! holy crap, that slowed me down a LOT! :)

A few things I found and a few suggestions (my preference from one time experience): for my 2002 e39 525i, there is no trunk fuse for the fuel pump. Other online specs say fuse 17 and 31. I tried 17 and car kept running. I then yanked 31 and 5 secs later it was sputtering. 10 secs, dead. Also, there WILL be at least a liter of gas spillage (be prepared with container, rags, etc.). I would get ALL the clamps off first (less chance of sparking once the gas comes. Then I would get ALL the hoses loose (phew, lot of effort especially in 30 degree weather). Now start disconnecting everything and just let the gas empty out of the lines. No use trying to do work while the gas is coming out. Once it's all out of the lines, clean it up, let it dry a little and move on.

5/16" hose it what I used. Use care to remember what lines go where. For me, it was easier to loosen the filter mounting bracket AND the lines from the pop-in clamps before and after the filter. It allowed the lines to hang and give me more working rooms with fitting the hoses one. They took a beating so don't worry too much about breaking them. if I didn't, they won't for you. :)

Putting it all together went very quickly. Car almost started first time. I did turn key to accessory position and let it sit 20 settings to see if that helped get the gas going. started right up after 2nd try. 4 hours though! :) changing diff fluid was less than an hour. Would have been even quicker but damn wind was blowing the draining oil everywhere. lol. Then that spout filler is very awkward and glad I had two bottles. It helped by pouring remainder of 1st bottle into the 2nd to give me more squeezing power to get the rest of the oil in the diff. All in all, it took closer to 1.2L - very easy job.

:)
 
#28 ·
Glad you got the filter changed out. Not easy in cold weather.

I bought a hand pump to fill the differential on my previous car. It's like a large metal syringe. It was the only way I could fill the differential on that car. I've used it to fill the transmission and suck the ATF out of the power steering reservoir. on my e39.
 
#30 · (Edited)
2001 BMW E39 530i Fuel Filter DIY

I always felt this DIY was weak, and lacked a lot of detail and photos. As a result, there are a lot of unknowns:
  • How do you jack up the car?
  • How do you remove those plastic undercarriage fasteners?
  • How much gas gushes out?
  • Should you disable the fuel pump fuse?
  • Which cars have those "self-destructing" crimp-style hose clamps? (Oteker)
  • Is the pressure regulator built-in?
  • Should you replace the fuel lines while you're there?

This is one reason I put it off for so long. Well, all this and more is addressed below.

This DIY took me about 5 hours.
A lot of it was the unknown, trying the wrong method, and thinking what if this/that....
If I did it again, it would probably take me 45 mins.

What follows is a more thorough DIY write up than what currently exists online.
I have several pieces of advice that will make your job faster & easier.

Parts to buy:

At 11 years and 120k miles, my fuel and vacuum lines were still good as new. They did not need to be replaced b/c of condition.
However, they are near impossible to remove! Trust me, just cut off ALL the hoses and clamps, and replace with new.
Don't try to remove and reuse them. Just trust me on this.

* 1 foot of fuel line. 5/16" ID (Inner Diameter). I got it at AutoZone for $8. Once you're in there, you will chop this into 3 small sections to match, and have some left over.

* Expanding Rivets. Part #51118174185. .26c/each at the dealer. They are reusable, but I ripped the head off one of the nails while trying to get it out. Don't get caught without spares. There are 4 or 5 holding the panel. Just buy 10, and save a few extra. I like to just replace everything with new stuff on the way back out.

* 6 hose clamps. 12-15mm. Part #07129952104. About .75c to $1/each. Dealer was $1.20

* 6 inches of vacuum line. Inner diameter 1/8". I had some left over from replacing some vacuum lines in the engine bay. I ordered from this seller for $1/foot. Great price
I ordered from this seller for $1/foot. Great price.

Total cost of all parts above is about $20.
I think I paid $52 for a Mann filter from AutoHauzAZ.com
Fuel filter can be found using part number 13321709535 on the website I made... www.furiousmethod.com

Extra tools to have on hand:
* Utility knife.
* Tin snip / wire cutter. You need a larger one for leverage. (To cut off the single use OEM hose clamps)
* Needle-nose pliers
* I used the small 1/4" drive sockets (5, 8, 10mm)
* $5 thumb wheel ratchet came in handy.
* I wish I had a $5 trim pry bar on hand Else, just pry expanding rivets off with flathead and/or needlenose. Be patient, some can really be tight.
* Dishtowel and large radius bowl to absorb spilled gas.

Jacking up the car

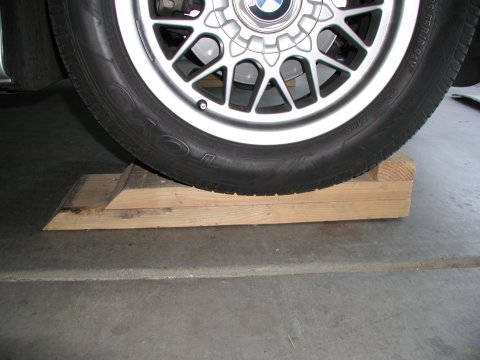
I used this $85 low profile jack

* First, I drove up onto 2 staggered planks of wood. This gave me extra clearance room to get my low profile jack under the front bumper to raise the car from the middle jack block (under the engine)
* Chock the wheels, pull the E-brake.
* Jack up the car.
* Put 2 jack stands at the side jack points.
* Lower car onto jack stands.
* Remove jack.

Image


Image
Image


Removing undercarriage panel
See this video to see how the expanding rivets work.

* Once you pry up the expanding rivet nailhead, just pry a screwdriver b/w the car and the panel, and just pop off the panel and rivet at the same time . There's no need to try to pry it up from the base. Use a little muscle and give it a quick "pop". It can take it.

* You'll also need to remove 2 screws in the wheel well.

* There are a few other bolts you'll need to remove. They all came off easily. One inner tab is hooked onto a bracket, so don't be afraid to get under the car and look at the inside edge of the panel.
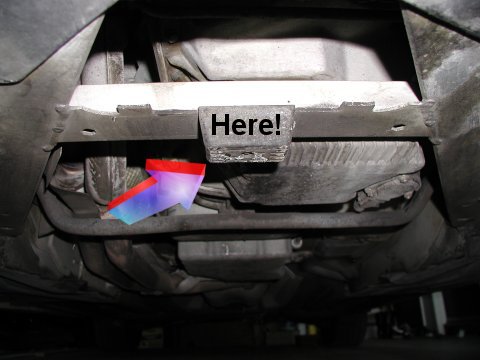
Removing the filter
Vacuum line
Image

Front fuel line
Image


Note: I did NOT remove the fuel pump fuse in the glove box. Why? I was curious if it was necessary, and just how much gas would actually come out with fuel pump pressure still on. See below.
Note: In the rear, make sure you notice that the curved fuel line goes to the center nipple of the fuel filter.

* Ok, let's start! First, loosen all the hose clamps, and move them to the middle of the hose area. Use the ratchet. I think it was 5mm. Screwdrivers suck on hose clamps. One was rusted solid and stripped, but thankfully it was on the filter side, so I never had to remove it.

* JUST CUT OFF THE HOSES. Don't try to properly remove and save them. You will waste a TON of time trying to pry them off. There is very little play with these hoses, and it's very hard to get a proper grip. I have no idea how you can twist or pry these hoses off. I sat there for a long time wrestling, picking, prying, pushing, pulling...all to no avail.
In the end, I decided to cut the hoses with the utility knife. Mentally, this was the hardest part of the entire DIY, b/c once you cut/destroy, there's no going back. The car is now inoperable. Now, the only way out is to complete the entire job successfully, or get a tow to the mechanic.

I only detached the side of the hoses that were attached to the car. I did not detach the hoses from the fuel filter itself. First, I sliced the vacuum hose to get it off. Then I sliced the front fuel hose and forced it off. The filter then pivots down and I drained it into a tupperware dish. When I sliced the fuel hose, there was an small initial pressurized squirt (like a Windex bottle), but then it was just a steady dribble. It took a minute or two to drain. When done, place a towel at the front to absorb additional gas that spills while you now work the rear hoses (and move the bowl there)
Image


This is how much gas came out of the front.
Image


Note all 4 hoses are still attached on the filter side.
Image


I then worked on the back 2 hoses. One of the back hoses had the "single use" OEM clamps that have no screws. They must be destroyed to be removed, and are a bitch to remove. I used a combination of large tin snips, needle-nose pliers, and wire cutters to mangle this ****er until it finally unraveled. Notice the notches, as soon as you have some play, try to unravel the clamp. This probably took me 15+ mins to finally get off. Get comfortable. The other 2 hoses had screwdriver-type hose clamps. Note that after you get the first hose off, the last hose can be removed quickly by simply spinning the entire fuel filter a few times around until the 2nd hose snaps its seal and slides off.
Image
Image

Image


There is a bracket holding the fuel filter in place. In hindsight, I think it's best to leave this on until the last step! This way, you don't even need to drain it. Just cut all 3 hoses off, then detach the bracket and slowly lower the filter. Stick your head in there to see how the bracket works. Careful, there is some sort of "star" washer that the end of the bolt screws into once it's all the way in. When you remove the bracket, it will fall down. You'll need to hold this up in place (blind) when you're reassembling. You hold it above the backet so the bolt threads into it once it's all the way through both holes. You'll see.

Here is all the drained fuel. Total maybe 6-12 ounces?. I guess there was dirt in the filter.
Image
Image


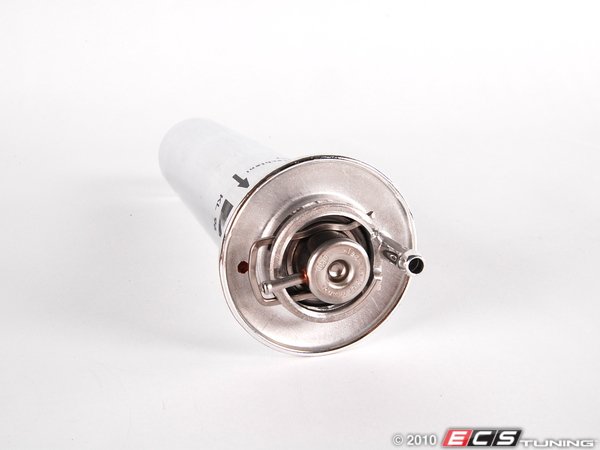
Reattaching the filter
Install the old filter's bracket & rubber bushing onto the new filter.

Next, attach the new vacuum line to the plastic tube on the car. If you try to attach the vacuum line to the fuel filter first, and wait to attach the other end once the filter is in the way, it will be harder. You need to grab the plastic tube, and muscle on the vacuum line. Push hard! Get it on there.

I reattached the 2 rear hoses first. If you attach the front line first, you'll never get these back on. There's just no play here. Hoses are stiff. So, connect these first! Put the 2 hose clamps around each hose before reattaching! Also, the curved fuel line went to the center nipple of the fuel filter.
Image

Image
Image


In the front, I then connected the vacuum line. Then, I connected the front fuel line. You'll notice the front metal fuel line can be pushed forward to give yourself some room to get the front fuel hose seated. You'll need to flex the front fuel hose a little also.
Image


Parting shot before putting the panel back on.
Image


Reattaching the panel
To replace the panel, first "hook" that inner tab...Then reattach the main center bolt in that cavity.
With lots of play in the barely attached panel, now attach the front wheel well bolts.
You'll need to wiggle the panel around from the bottom while you try to catch the bolt into the thread. See if you can eyeball the threads through the hole.
Then attach the other bolts. Finally, push in your new expanding rivets. This felt good....

Image


Starting the car
I didn't start the car until everything was buttoned up. To build fuel pump pressure again, I left the key in accessory mode for about 5 mins, while I cleaned up.
Car immediately started on the first crank, as if no gas was ever let out. Zero hesitation!

Now that its over, I'm glad I did this one.
At times I felt I was in over my head, b/c of so many "what now/ which way" moments.
I think having this DIY will make it a lot easier and concrete.
 
#35 ·
I've purchased BMW clamps before--they are exactly what you can buy at autozone--and don't work right. They loosen over time. BMW recommends crimp clamps for the fuel line. It's just that us DIYers use traditional clamps. I'm rethinking that now though.

I'm sure many here have a leak and don't know it because it only leaks after about 10 hours of sitting, and only leaks for a few minutes at a low rate, and quickly dries. Start your car in the morning after sitting at least 10 hours (didn't do it at 8 hours interestingly enough). Look under car, the drivers side seat floor. Within 30 seconds of starting you hopefully do not see a steady drip of gas. Drive 5 minutes and it stops leaking which was surprising. Won't leak again for about 10 hours of sitting. Nonetheless, I've tightened they way up and it's ok. Will look at norman crimp clamps next.