BMW Forum - BimmerFest BMW Forums banner

Z3: IE Rear Toe/Camber Install

42K views 39 replies 13 participants last post by  Brad5161  
#1 ·
I spent last week doing some upgrades one of which was installing the IE toe and camber adjusters.

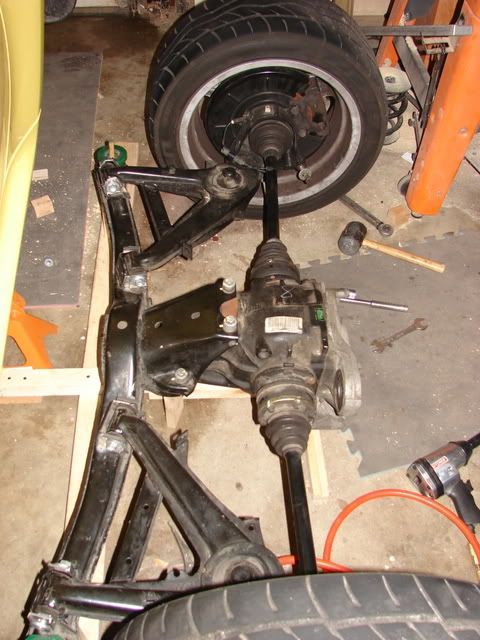
I had the alignment checked late last year and found some significant differences from side to side.

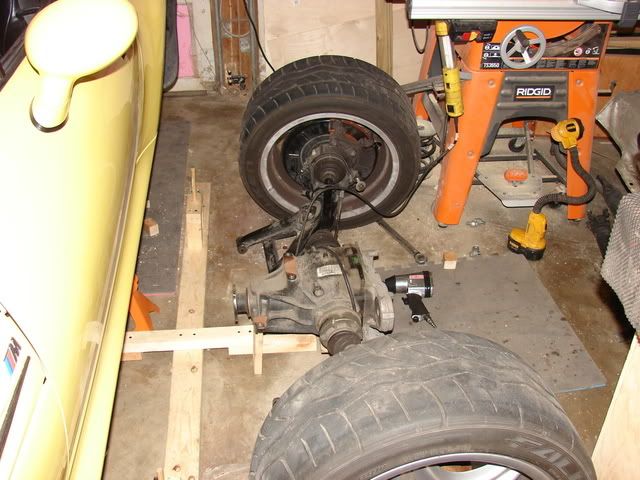
First step was to drop the rear subframe and suspension. Built a frame to support the subframe while it was out of the car. This allowed me to understand the amount of adjustment as I created the slots for the adjusters.

Image


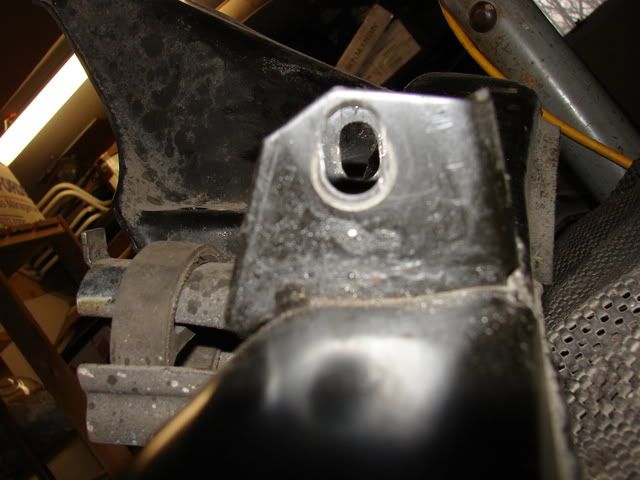
I then started to create the slots required for the excentric bolts to move in.

The inboard mounts will adjust the Camber and the slots run Vertically.
The outboard mounts will adjust the Toe and the slots run horizontally.

Image

Image


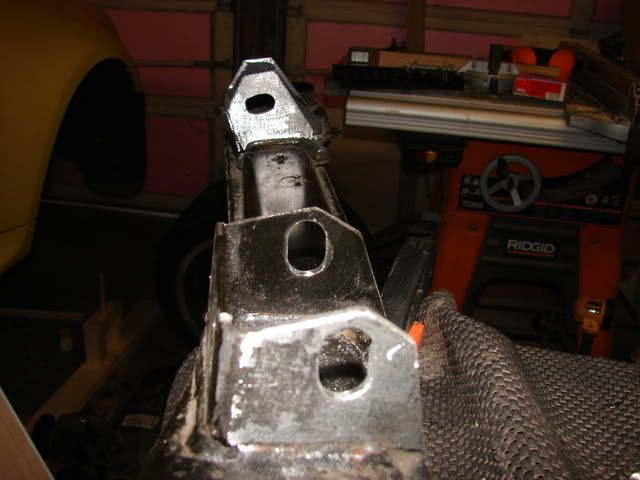
I used a round file and a air powered die grinder to create the slots.

The vertical slots started from the stock location and were opened upwards.

The horizontal slots would normally be centered on the stock location but I made them more to the front as I had toe out problems.

Image


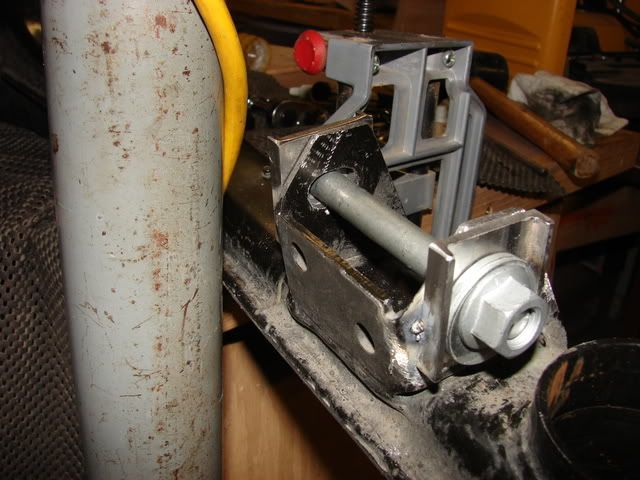
Once the slots where the correct size to allow the bolts full range of travel I tacked the supplied plates into place and test fitted the control arms.

Both bolts, on each arm are inserted from between the two mounting points.

This showed some issues with the initial placement of the plates so I removed and re-tacked the affected plates.

Image


I took the subrame to a local shop to have the plates welded into location and then painted the subframe before re-installing.

Image


The IE subframe bushings required to have a small section removed to allow the outside nut's to be fitted.

I also had to remove approx 1/8" from the large washer at the top of the two bolts that locate the subframe. Otherwise the new bolts would contact the washer and stop the subframe locating correctly.

I still have to take the car for a full alignment but it's looking good so far.
 
#4 ·
1st: Will you do my Coupe next please?

2nd: Holy shiit you're brave and talented.

3rd: For those of us that have replaced our springs and shocks and understand the basics of the factory hard set camber welded in subframe, but not the subtleties of the fabrication needed to correct BMWs short cuts, I'm confused by something. Are you saying that IE offers an eccentric bolt and bushing kit? Then why did you need to also create the inboard camber slotting and the outboard toe slotting?

I'm interested in eccentric kits.. that work and hold... but am concerned about weld in options like Dinan, etc.. I live in more or less bubba-ville. "Goofy's Mufflers" are considered the resident welding experts. How could I take my Coupe there?!
:yikes:
 
#5 ·
There are two IE products involved in this mod so that may have caused the confusion.

IE subframe bushings - these are a common mod.

IE "weld in" TOE/Camber kit.

The bushings replace the stock rubber bushings to stop the subframe moving so much.

The IE TOE/Camber kit consists of a set of bolts (with excentric washers) and metal plates that are welded to the subframe.
See the 4th picture in the post.

The excentric bolts allow cause the location of the bolt to alter depending on it's orientation.

Moving the inboard mounting point upwards causes the wheel hub angle to change and the Camber is reduced.

Moving the outboard mounting forward changes the toe to make the wheel point towards the middle of the car, moving it backwards causes the wheel to point out from the car.

Here is a quick diagram. The top picture is looking down on the "car", the bottom picture is looking from behind the "car".

Image
 
#6 ·
Ok.. now I'm getting it on the mechanics of how the eccentric is working. Thanks.

So you're saying that the only normally required part is slotting the existing mounts on the subframe, but that what you did differently was to have the cars alignment checked first so that you knew more precisely what your toe situation was, and you then slotted the outers a little more forward than "both ways off of center". Very cool. Smart.

When a stock Z3 is lowered via springs, does this equate to causing more toe out (kinda like lowering equates to more negative camber no matter what). If true.. my now lowered Coupe will not only wear tires faster because of the added negative camber, but because I have more toe out??

I haven't taken the car in to have the alignment checked yet. I don't know what the stock numbers (range) should be. Do you by chance?

The grinding would be within my capabilities, but I have no welder to tack with (hmm... a neighbor does though). But mainly, I think the removal and installation of the subframe and diff and drive shaft are way over my head. How much would this kind of work cost if I had it done?

Thanks.
 
#7 ·
I've seen estimates from $300 to $600 to drop the subframe and install IE bushings.

Expect another $100 for the welding, and another $300 to $600 for the work to slot the subframe and install the IE parts.

Throw another $100 for the alignment and your looking at between $800 and $1400

Stock Rear alingment specs I have are

Camber -1.3 to -2.3
Toe 0 to +0.5 (with Positive = wheel point inwards and negative = wheel pointing outwards)

My specs before were

Left Camber -1.1
Left Toe -0.11
Right Camber -2
Right Toe -0.68
 
#8 ·
Just got back from the alignment shop and everything is back within spec at the rear (even with the car lowered 1")

Left Camber -1.9
Left Toe 0.09
Right Camber -2.1
Right Toe 0.1

Toe adjustment range was -0.7 to +0.5
Camber was over a deg as well.
 
#9 ·
Excellent work. I'm envious.
So.. did you manually align the camber and toe on your hand made rack, and you're saying you hit those numbers (only used the alignment shop to get a reading)? Or, once you had it at the shop did they get under there and adjust the eccentrics?
 
#10 ·
Great Job!

I did this a couple of years ago. Best thing I ever did to the Z. :)I started out with a new crossmember, kinda expensive but I knew it was not bent in any fashion. I had over 3 degrees of neg camber with stock springs and we got it back to a degree. I'm to old and fat to do this on jack stands so I sub- contracted the fix. Cost w/o the new crossmember was $1400. I did replace the trailing arm bushings w/ stock as well. Why BMW didn't do this from day one is a mystery to me. :dunno:It would have cost them maybe $1.50 a car and think of all the grief it would have solved. :mad:
 
#12 ·
Why BMW didn't do this from day one is a mystery to me. :dunno:It would have cost them maybe $1.50 a car and think of all the grief it would have solved. :mad:
If you go to the KMAC web site (they make an eccentric bolt kit) and hit their car brand and model drop down you get.. basically every car built in the world since 1988. As they cover on their site, every car maker in the world "went cheap arse" on their consumers some time in the 80's. NONE of them have front and rear camber adjustment, rear toe, or front caster. THe only thing you can adjust is front toe... in case you hit a curb and bend a steering arm.

It is very disappointing that BMW followed along with this trend.

Here is something interesting though. I just found out 3 weeks ago that my 2003 X5 actually has rear camber and toe adjustment. Simple, easy, lock down effective. So apparently they've started to get smart again. This, of course, does me NO good at all, because I lowered my Coupe but won't necessarily lower the X5. Doh!
 
#17 ·
Pull the alignment pin and just the slotted strut tower. You can go about 0.5 degrees each way. Most poeple go an extra -0.5 degrees. It is really there for crash damage adjustment, but no reason you can't use it for general alignment.
 
#19 ·
Very limited instructions. not much more than one veritical and one horizontal slot.

Obvoiusly the closer you can get them to true horizontal and vertical the better but a slight variation is not an issue. The important thing is to have an alignment done before install so that you can select to bias the slots in the right direction to get the most adjustment when installed.

e.g. I had toe out so I made the slots for that as far to the front as possible.
 
#22 ·
How do you know which tabs to H and which to V?
Horizontal on outboard brackets (near subframe mount points) for toe, vertical on inboard brackets for camber.

Image


Image


I plan to be putting this together with a new subframe and one new trailing arm, so my alignment will be obsolete. Would you say I just split the difference from the center?
Yes, that will work fine (it's what Randy and I did on my car).
 
#25 ·
I took the whole rear end out as a single section. Then remove the crossmember from the diff and trailling arms.
 
#27 ·
Look at the first picture in the thread...no need to touch the diff or halfshafts. Though watch out for the halfshafts "poping" out of the diff as you move things around. They just click back into place.
 
#31 ·
How bad is pulling the subframe studs? 27MM extra deep, or once the subframe is gone, I would just need a wrench. How can I torque it...hmm.

I think I saw Randy post a custom socket he made.

Any recommendations for grinding bits? My compressor only puts out 3.6scfm @ 90psi which is less than most pneumatic grinders. Might have to go electric.
 
#33 ·
Why are you removeing the studs ?

I had a cheap die grinder. did most with a hand file
 
#32 ·
1-1/16" crowfoot flare will probably work, say an Armstrong 11-849.

I think Randy and I used a carbide bit, conical. If I had to do it again I think I'd use CBN (cubic boron nitride) bits, 120 grit. It's take more time but less hand fatigue.

Ingersoll-Rand 3101G should work OK with your compressor and is very durable for the price (I've been hard on mine for years and it still works like new).
 
#35 ·
8inch 3/8 Carridge bolt, selection of washers (2", 1.5" and 1"), bolt (or threaded rod joiner - more thread surface, ledd strian on bolt threads)

to remove use a 1 1/4" T, to insert use a 1" connector . Cast iron.

Image


Image
 
#38 ·
That far out and it's probably a bent arm
 
#40 ·
I just got to reading this and I must say...excellent write-up. I did alignments for a few years and THIS needs to be done to these cars. Since I am also a trained machinist who can weld...It WILL be done.

Two benefits: First the car handles better. Second it will save a small fortune in tires!
Would you be willing to install the toe and camber kits on a 2000 Z3 Coupe? I'm in Maryland