

Problem description
Original BMW design of the Crank Case Ventilation (CCV) device is extremely inefficient and failure-prone device. What is worse, its failure causes some serious damage to the whole engine. To add salt to injury, the worst failures happen in sub-zero temps when you really need your machine to be reliable. In certain parts of the world and in certain times the design of this kind would be considered sabotage.
While this and other BMW forums contain multiple descriptions of CCV delete procedure, I failed to find any really clear step-by-step ones.
What is being done
1. CCV completely removed.
2. Additional maintenance work "while you are there" - as required.
3. The oil catch can and a PCV valve introduced into the CCV circuit.
Goals
1. Eliminate a failure point that can cause complete engine break-down.
2. Eliminate water vapor and gunk from lubrication system
3. Eliminate or substantially decrease engine oil consumption.
Difficulty Level - 4/10.
It may look scary before you commence, but all it really takes is patience. And I cannot overstress the importance of good lighting. A regular portable 110V light with a 60W equivalent LED bulb is cheap and very effective. And even if you crash the bulb, it still works.
And finally, unless you have some super-strong back muscles or are really errrr…. vertically challenged, put the vehicle on ramps.
Materials
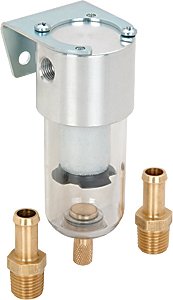
1. Oil catch can.
![Image]()
While there are dozens of cheap alternatives on fleabay, I selected this variant.
Positives: transparent, so I can easily monitor the level of "pulp"; it is glass, not plastic; internal vapor filter; quality construction.
Negatives: it is pretty expensive, would prefer larger volume.
Cheaper alternative
![Image]()
Negatives - it is made of plastic, too small volume, questionable drainage design.
2. Oil-resistant 3/4" & 3/8" 250 psi hoses (5ft of each in case you have botched a piece and need to recut them). with this psi rating the hose is stiff enough to prevent flattening with vacuum.
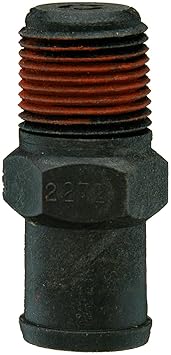
3. Connecting fittings
4. Hose clamps
5. Heavy duty heat shrink boot for electrical connections.
6. Some bracket or holder for the catch can
7. ***1052;6 lock nuts (2 ea).
What we do
1.
Remove the CCV. There are dozens of perfectly documented procedures already, just search them. I'll just outline the main steps:
2.
While you are at it, spend 10 minutes to remove DISA and check if its mechanism is good. I caught mine just before the failure with its pin travelling into the guts of the intake manifold and further. German Auto Solutions repair kit is a marvel worth every penny (but there will take lots of them).
3.
To simplify the install I used the original connectors from the CCV hoses. I cut the flex pipe parts off, leaving only the thick-walled quick disconnect pieces for further use. Clean of all dirt and burrs and install the hoses. Make sure the hoses are sat tight to avoid vacuum leaks.
![Image]()
4.
I kept the thin connector pipe that goes to the manifold far end as it was nearly new and clean.
5.
Cut of the oil drain rubber hose on the dipstick and plug it.
4.
Install the catch can. I used the stck bracket that came with the can and located it on the left fender bracket as shown below, using the threaded pins already welded in place. They are M6 thread.
![Image]()
5.
¾" hose connects the outlet on the cam cover with the catch can inlet and the catch can outlet with the FRAM FV345 PCV valve (off a 3.2/3.5L Chrysler engine).
![Image]()
After that I used 3/8" hose that goes all way to the modified BMW connector that plugs into the manifold in the front. I do not like the way I routed the 3/8" hose as it sags too much down, and eventually may modify that part.
5.
Install hose clamps as necessary to prevent any vacuum leaks and maintain the integrity of connections.
General view
![Image]()
Detailed view
![Image]()
Effectiveness.
The mod was completed and tried at -25degC (-13F for US folks). It took about 300 km (200 miles) of non-stop drive at 60-70 mph to fill the catch can with a yellow stinky mix of water condensate and oil vapor. It pains to see this pulp going into the oil pan.
Then the car was parked outside for a few hours and the same drive back - this time resulting only in ½ of the can filled with yellow gunk.
![Image]()
So far I racked up about 2000 km after all my mods and all my goals are met:
And by the way, if anybody is interested in exchanging a perfectly working SAP assembly, stock water pump and the CCV body for a bottle or two of rose wine (one from Dirty Laundry Winery in BC would be awesome thank you very much), please feel free to chime in. I am in Calgary.
![Image]()
5 years update.
The system has been implemented in 4 M54 units (3 E39, 1 E46). Cumulative mileage for them is now over 100,000 miles. No issues with any of the engines. In fact, I notice they run much smoother and breathe more freely.
Now, I made some changes to the original setup based on the operation operation of the first car.
First, after running the system for a while I added a vacuum regulator to keep the vacuum balance. I do not recall the spec numbers, but now if you try to open an oil filler cap when the engine idles, it is slightly sucked to the cam cover. The vacuum regulator is an adjustable valve from amazon that I set up using vacuum gage. The valve is installed on the previously capped "branch" of the oil dipstick Y-tube via a 3/8 hose and clamps. On top of the valve I put a K&N breather
Second, I rerouted the hoses and repositioned the catch can. It now sits behind the power steering bottle, between the engine and air filter box. It is now a bit more difficult to get to and empty. But the advantage is that the hose to the can and the can itself in winter warm up instantly and always stay hot, so the condensation does not accumulate as fast. Warm vapors just fly through into the intake.
The overall view with the vacuum regulator and filter.
![Image]()
The E46 is tighter and I could not put the can in the same spot. So I had to get inventive and made a nice bracket with a heat shild to hang the catch can on the right strut turret behind the washer tank, using existing threaded connections that it had. Unfortunately, the pictures were all lost.
Original BMW design of the Crank Case Ventilation (CCV) device is extremely inefficient and failure-prone device. What is worse, its failure causes some serious damage to the whole engine. To add salt to injury, the worst failures happen in sub-zero temps when you really need your machine to be reliable. In certain parts of the world and in certain times the design of this kind would be considered sabotage.
While this and other BMW forums contain multiple descriptions of CCV delete procedure, I failed to find any really clear step-by-step ones.
What is being done
1. CCV completely removed.
2. Additional maintenance work "while you are there" - as required.
3. The oil catch can and a PCV valve introduced into the CCV circuit.
Goals
1. Eliminate a failure point that can cause complete engine break-down.
2. Eliminate water vapor and gunk from lubrication system
3. Eliminate or substantially decrease engine oil consumption.
Difficulty Level - 4/10.
It may look scary before you commence, but all it really takes is patience. And I cannot overstress the importance of good lighting. A regular portable 110V light with a 60W equivalent LED bulb is cheap and very effective. And even if you crash the bulb, it still works.
And finally, unless you have some super-strong back muscles or are really errrr…. vertically challenged, put the vehicle on ramps.
Materials
1. Oil catch can.

While there are dozens of cheap alternatives on fleabay, I selected this variant.
Positives: transparent, so I can easily monitor the level of "pulp"; it is glass, not plastic; internal vapor filter; quality construction.
Negatives: it is pretty expensive, would prefer larger volume.
Cheaper alternative
Negatives - it is made of plastic, too small volume, questionable drainage design.
2. Oil-resistant 3/4" & 3/8" 250 psi hoses (5ft of each in case you have botched a piece and need to recut them). with this psi rating the hose is stiff enough to prevent flattening with vacuum.
3. Connecting fittings
4. Hose clamps
5. Heavy duty heat shrink boot for electrical connections.
6. Some bracket or holder for the catch can
7. ***1052;6 lock nuts (2 ea).
What we do
1.
Remove the CCV. There are dozens of perfectly documented procedures already, just search them. I'll just outline the main steps:
- Remove the intake, MAF and the throttle.
- Cut off or break the plastic hoses to the CCV body.
- Pull the rotten contraption out.
- Plug the oil dipstick outlet.
2.
While you are at it, spend 10 minutes to remove DISA and check if its mechanism is good. I caught mine just before the failure with its pin travelling into the guts of the intake manifold and further. German Auto Solutions repair kit is a marvel worth every penny (but there will take lots of them).
3.
To simplify the install I used the original connectors from the CCV hoses. I cut the flex pipe parts off, leaving only the thick-walled quick disconnect pieces for further use. Clean of all dirt and burrs and install the hoses. Make sure the hoses are sat tight to avoid vacuum leaks.

4.
I kept the thin connector pipe that goes to the manifold far end as it was nearly new and clean.
5.
Cut of the oil drain rubber hose on the dipstick and plug it.
4.
Install the catch can. I used the stck bracket that came with the can and located it on the left fender bracket as shown below, using the threaded pins already welded in place. They are M6 thread.

5.
¾" hose connects the outlet on the cam cover with the catch can inlet and the catch can outlet with the FRAM FV345 PCV valve (off a 3.2/3.5L Chrysler engine).
After that I used 3/8" hose that goes all way to the modified BMW connector that plugs into the manifold in the front. I do not like the way I routed the 3/8" hose as it sags too much down, and eventually may modify that part.
5.
Install hose clamps as necessary to prevent any vacuum leaks and maintain the integrity of connections.
General view

Detailed view

Effectiveness.
The mod was completed and tried at -25degC (-13F for US folks). It took about 300 km (200 miles) of non-stop drive at 60-70 mph to fill the catch can with a yellow stinky mix of water condensate and oil vapor. It pains to see this pulp going into the oil pan.
Then the car was parked outside for a few hours and the same drive back - this time resulting only in ½ of the can filled with yellow gunk.

So far I racked up about 2000 km after all my mods and all my goals are met:
- 0 oil consumption detected (but I will need more kms put down to reliably claim that)
- I check several times the hose between the PCV valve and the intake and only saw a few clean droplets of oil there.
And by the way, if anybody is interested in exchanging a perfectly working SAP assembly, stock water pump and the CCV body for a bottle or two of rose wine (one from Dirty Laundry Winery in BC would be awesome thank you very much), please feel free to chime in. I am in Calgary.

5 years update.
The system has been implemented in 4 M54 units (3 E39, 1 E46). Cumulative mileage for them is now over 100,000 miles. No issues with any of the engines. In fact, I notice they run much smoother and breathe more freely.
Now, I made some changes to the original setup based on the operation operation of the first car.
First, after running the system for a while I added a vacuum regulator to keep the vacuum balance. I do not recall the spec numbers, but now if you try to open an oil filler cap when the engine idles, it is slightly sucked to the cam cover. The vacuum regulator is an adjustable valve from amazon that I set up using vacuum gage. The valve is installed on the previously capped "branch" of the oil dipstick Y-tube via a 3/8 hose and clamps. On top of the valve I put a K&N breather
Second, I rerouted the hoses and repositioned the catch can. It now sits behind the power steering bottle, between the engine and air filter box. It is now a bit more difficult to get to and empty. But the advantage is that the hose to the can and the can itself in winter warm up instantly and always stay hot, so the condensation does not accumulate as fast. Warm vapors just fly through into the intake.
The overall view with the vacuum regulator and filter.
The E46 is tighter and I could not put the can in the same spot. So I had to get inventive and made a nice bracket with a heat shild to hang the catch can on the right strut turret behind the washer tank, using existing threaded connections that it had. Unfortunately, the pictures were all lost.


