

I have had an oil leak around the oil housing, and I've also noticed that oil feeder pipe to VANOS has been leaking, as it was drenched in oil.
The problem which I didn't solve in this DIY was the noise coming from the belts. Initially I thought it would be the idler pulley, but the noise did not go away.
Here's a video of the noise:
This DIY maybe helps somebody who has the same problem.
This is not a DIY you do as your first DIY, as it has many components which you should already be familiar.
Tools:
Parts:
Work performed on a 2001 325i, with automatic transmission.
____________________________________________________________________________
Disconnect the negative terminal of your battery.
Also raise the front of your car because it will be help you later on. Put the car on jack stands.
1. Remove the air intake passage which connects to your air box.
2. Remove the air box.
![Image]()
![Image]()
....
3. Remove the fan shroud. For some of you this may be an easy step, but I decided to document it for somebody like me who needs even the most minuscule details.
![Image]()
![Image]()
4. Those with automatic tranny will have to remove the fan nut, but to have more room I decided to remove the left side only of the upper coolant hose.
![Image]()
5. Use a 1 1/4 wrench to remove the fan.
![Image]()
Remove the power steering reservoir holding and put it to the side. I think I misspelled the word 'reservoir' in the picture.
![Image]()
------------
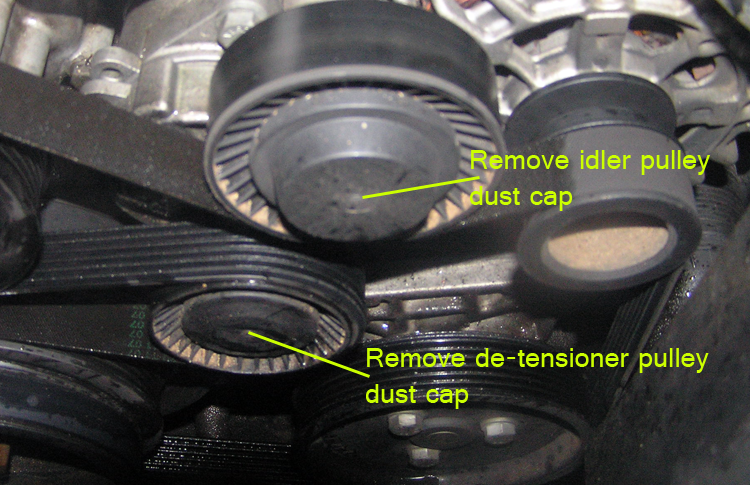
6. Remove the dust caps.
![Image]()
--------------
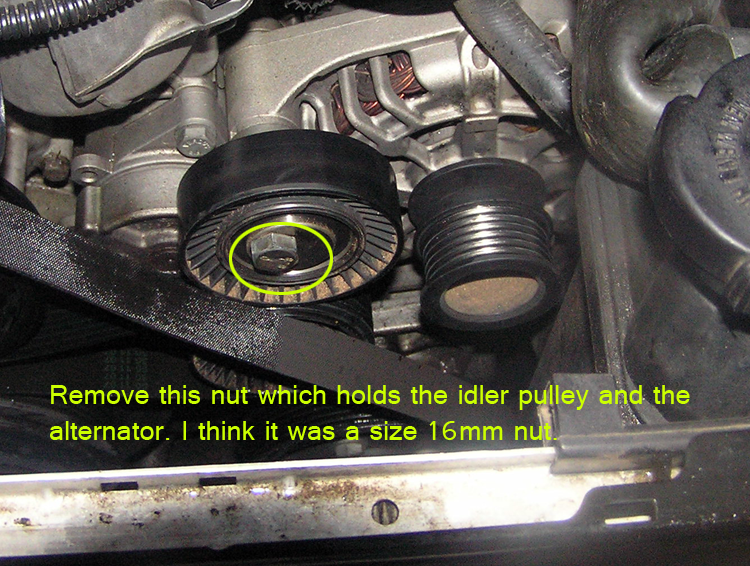
7. De-tension the belt. Then remove the belt from the idler pulley. If you are re-using the belt, mark the direction of the movement, and install it the in the same direction.
![Image]()
![Image]()
If you are only replacing the idler pulley only, stop here, and install by reversing the steps.
------------------------
![Image]()
![Image]()
![Image]()
Alternator is now out.
![Image]()
---------------------
Now loosen the oil filter cap with a 36mm socket, this will allow the oil to drain completely in the pan. I didn't take a pic of this step.
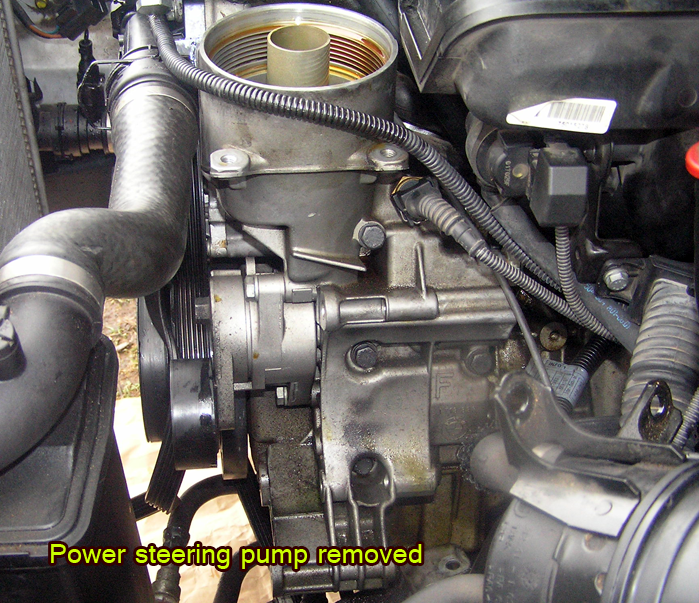
Now we need to remove the power steering pump (PSP). The PSP has three nuts, 13mm, two on opposite sides on top, and one on the bottom. The one on the bottom you can get to if you hahve raised your car. You can get to it from the top or bottom.
![Image]()
![Image]()
![Image]()
Just put the PSP on the side, out of you way. The oil filter housing is now exposed.
--------------------
Remove the oil pipe feeder to VANOS. This hose connects the oil filter housing (OFH) and the VANOS. If you are not replacing the oil pipe, then just remove the bottom side. You will need two new washers though.
![Image]()
Now remove the nuts which hold the OFH in.
![Image]()
![Image]()
![Image]()
Installation.
By now you should be very familiar with the process, and the installation is the reverse of this DIY.
If anybody knows why my car makes that noise in the video, please tell me.
PS: If you remove the upper coolant hose, be sure to bleed the system before starting the car. To bleed it: loosen bleeder screw on expansion tank, turn heater on to 91, then pour coolant or distilled water slowly until you see it coming out of the bleeder screw. Tighten it and you're done.
The problem which I didn't solve in this DIY was the noise coming from the belts. Initially I thought it would be the idler pulley, but the noise did not go away.
Here's a video of the noise:
This DIY maybe helps somebody who has the same problem.
This is not a DIY you do as your first DIY, as it has many components which you should already be familiar.
Tools:
- Sockets: 10mm, 13mm, 14mm, 16mm
- Wrenches, 1 1/4 inch, 10mm, 13mm, 14mm, 17mm, 19mm, 36mm
- Other various parts, maybe a pry bar, lubricant.
Parts:
- Idler pulley 11281738605
- Washers 007603-014106 (need 4 or two, read below)
- Gasket for oil filer housing 11421719855
- Oil filter and oil if you are going to change your oil too.
- Oil pipe to VANOS 11361705532
Work performed on a 2001 325i, with automatic transmission.
____________________________________________________________________________
Disconnect the negative terminal of your battery.
Also raise the front of your car because it will be help you later on. Put the car on jack stands.
1. Remove the air intake passage which connects to your air box.
2. Remove the air box.


....
3. Remove the fan shroud. For some of you this may be an easy step, but I decided to document it for somebody like me who needs even the most minuscule details.


4. Those with automatic tranny will have to remove the fan nut, but to have more room I decided to remove the left side only of the upper coolant hose.

5. Use a 1 1/4 wrench to remove the fan.

Remove the power steering reservoir holding and put it to the side. I think I misspelled the word 'reservoir' in the picture.

------------
6. Remove the dust caps.
--------------
7. De-tension the belt. Then remove the belt from the idler pulley. If you are re-using the belt, mark the direction of the movement, and install it the in the same direction.

If you are only replacing the idler pulley only, stop here, and install by reversing the steps.
------------------------

Alternator is now out.

---------------------
Now loosen the oil filter cap with a 36mm socket, this will allow the oil to drain completely in the pan. I didn't take a pic of this step.
Now we need to remove the power steering pump (PSP). The PSP has three nuts, 13mm, two on opposite sides on top, and one on the bottom. The one on the bottom you can get to if you hahve raised your car. You can get to it from the top or bottom.


Just put the PSP on the side, out of you way. The oil filter housing is now exposed.
--------------------
Remove the oil pipe feeder to VANOS. This hose connects the oil filter housing (OFH) and the VANOS. If you are not replacing the oil pipe, then just remove the bottom side. You will need two new washers though.

Now remove the nuts which hold the OFH in.


Installation.
By now you should be very familiar with the process, and the installation is the reverse of this DIY.
If anybody knows why my car makes that noise in the video, please tell me.
PS: If you remove the upper coolant hose, be sure to bleed the system before starting the car. To bleed it: loosen bleeder screw on expansion tank, turn heater on to 91, then pour coolant or distilled water slowly until you see it coming out of the bleeder screw. Tighten it and you're done.


